
Why Skylight Seal Replacement Is Worth Doing Right Away skylight seal replacement residential interior water leak Skylight seal replacement is the process of removing worn or cracked sealant around your
Why Skylight Seal Replacement Is Worth Doing Right Away
Skylight seal replacement is the process of removing worn or cracked sealant around your skylight frame and applying fresh, watertight material to stop leaks before they damage your home.
Here’s what you need to know at a glance:
| Step | What to Do |
|---|---|
| 1. Diagnose | Confirm it’s a real leak, not condensation |
| 2. Inspect | Check sealant, flashing, glass, and hardware |
| 3. Gather tools | Utility knife, caulking gun, silicone sealant, isopropyl alcohol |
| 4. Prep surface | Remove old sealant, clean thoroughly, let dry |
| 5. Apply sealant | Use exterior-grade silicone in one continuous bead |
| 6. Test | Run a low-pressure hose over the skylight and check inside |
| 7. Maintain | Inspect twice a year and replace sealant every 10-12 years |
There’s an old saying in the roofing world: there are two types of skylights — the ones that leak, and the ones that will leak. That might sound grim, but the good news is that most skylight leaks come down to one fixable problem: failed sealant or worn weatherstripping around the frame.
If you’ve noticed water dripping from your ceiling, brown rings around your skylight, or a musty smell in a room that gets a lot of natural light, you’re in the right place. This guide walks you through exactly how to diagnose, fix, and prevent skylight leaks — without needing a roofing crew.
I’m Feiruz Gabibov, Chief Operating Officer of WindoServ, and I’ve overseen hundreds of precision sealing jobs across New Jersey, making skylight seal replacement a core part of what our team handles every season. I’ll walk you through the same process our professionals follow, so you can tackle this with confidence.
Diagnosing Skylight Leaks vs. Condensation
Before you drag your ladder out of the garage, we need to solve a quick mystery. Is your skylight actually leaking, or is it just “sweating”?
In New Jersey, our homes face brutal temperature swings. We get freezing winters in Ridgewood and humid, sticky summers down in Monmouth County. When warm, humid indoor air rises and hits the cold glass of your skylight, it condenses into water droplets. If enough moisture builds up, it drips down, mimicking an active roof leak.
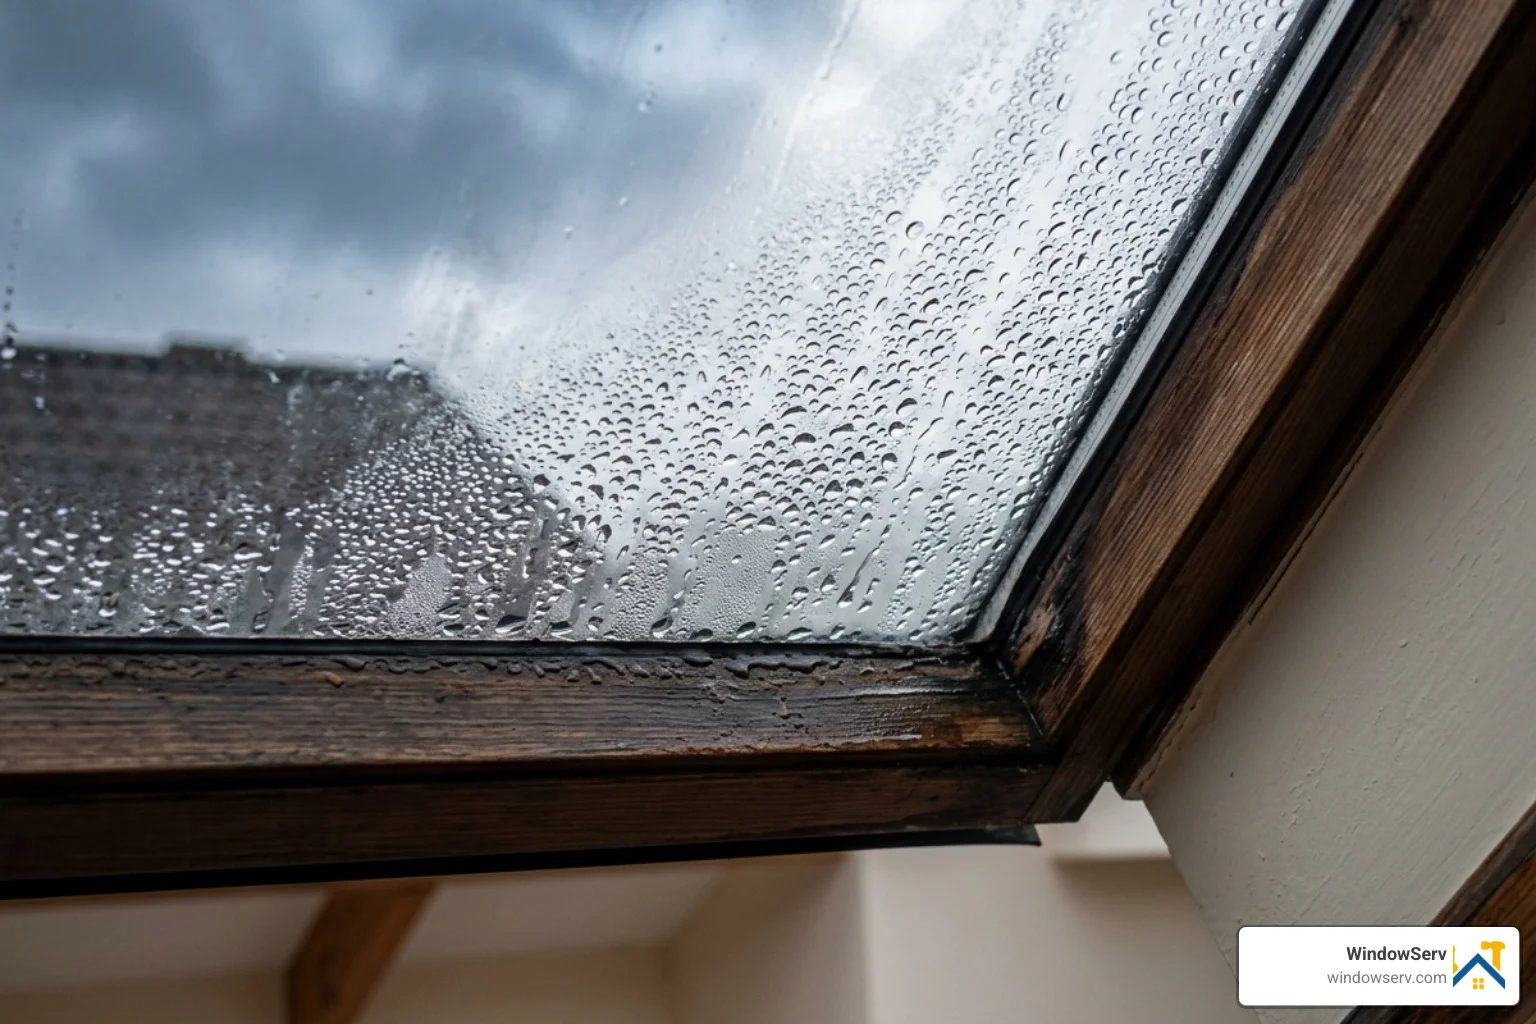
To rule out condensation, check the pattern of the moisture. Condensation usually forms evenly spaced beads across the glass surface. A true physical leak typically shows up as localized water running down the frame, brown water stains on your drywall, or peeling paint in the corners of the skylight shaft.
You can also test this by running a dehumidifier or increasing ventilation in the room. If the moisture disappears when the air dries out, you have a condensation issue. If you need more details on how to handle this indoors, check out our guide on window condensation repair in NJ or read up on understanding condensation between window panes.
Condensation vs. Active Leak Symptom Checker
| Symptom | Condensation | Active Leak |
|---|---|---|
| Moisture Pattern | Uniform beads across the entire glass pane | Localized runs, drips, or pooling in one corner |
| Weather Dependency | Occurs during extreme cold/hot indoor-outdoor temp swings | Occurs during or immediately after rainstorms |
| Drywall Condition | Dry, though there might be light surface mildew | Soft, damp, stained brown, or peeling paint |
| Weep Holes | Often clear but overwhelmed by high indoor humidity | May be clogged with dirt, leaves, and roofing debris |
Common Causes of Skylight Water Intrusion
If you’ve ruled out condensation, water is getting in from the outside. Here are the usual suspects:
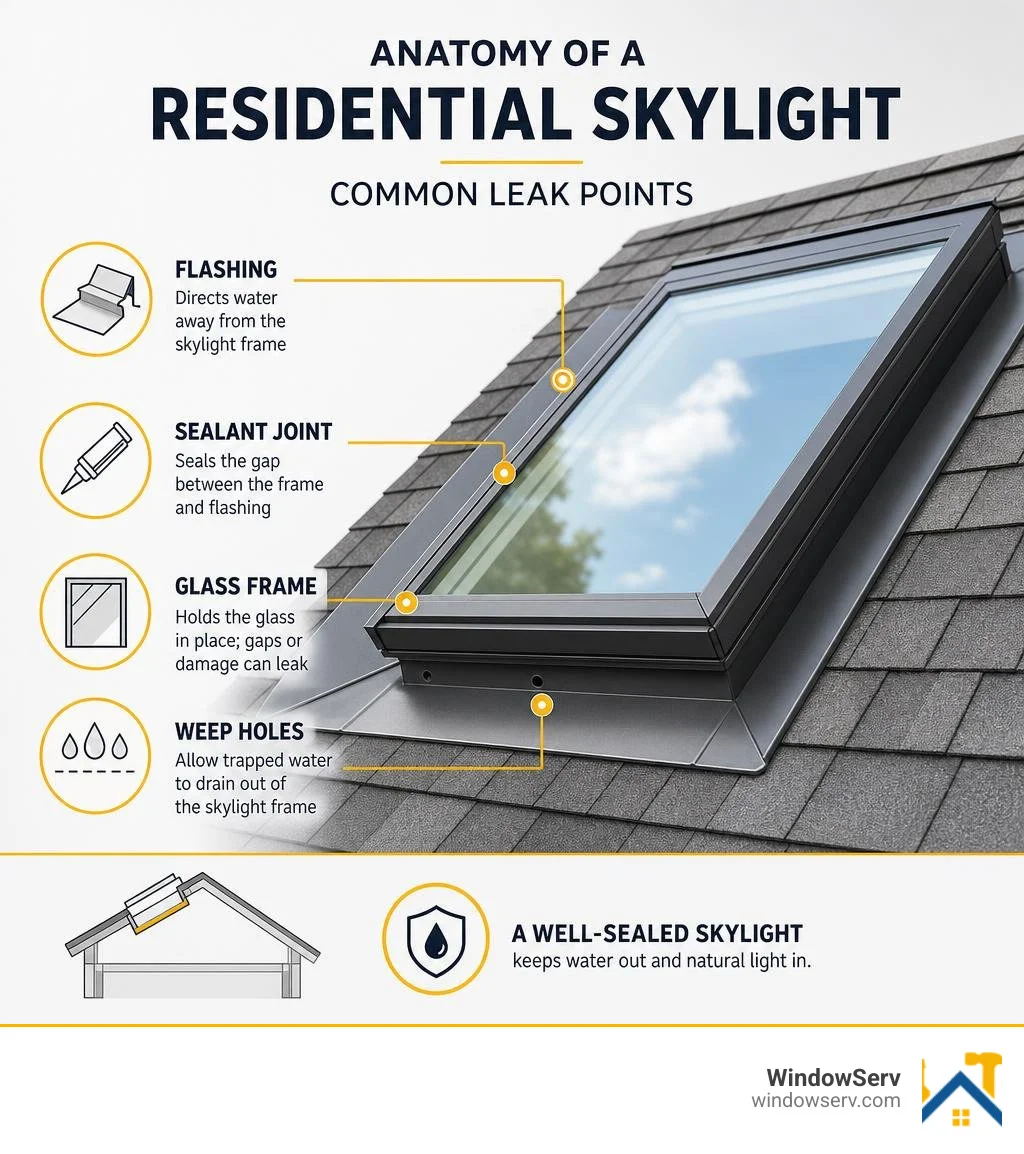
- Failed Flashing: Flashing is the metal border that seals the transition between your roof shingles and the skylight frame. Over time, wind, snow, and thermal expansion can lift or rust these metal pieces.
- Degraded Sealant: The silicone bead holding the glass to the frame takes a beating from UV rays. Over a decade, it loses its elasticity, cracks, and pulls away.
- Cracked Glass or Glazing: Hail, falling branches, or simple structural settling can cause hairline fractures in the glass.
- Loose Hardware: On operable skylights, the hinges, chains, and locking mechanisms can loosen, preventing the window from sealing tightly when closed.
- Debris Buildup: Leaves, pine needles, and dirt can pile up on the uphill side of the skylight, acting as a dam. This forces water to pool and seep under the shingles.
How to Safely Inspect Your Skylight
Safety is our absolute priority. Roof work is inherently risky, and we want you to stay safe. If you plan to inspect your skylight from the outside, follow this safety checklist:
- Pick Your Day: Only work on a clear, dry day with calm winds. Never step onto a wet, icy, or dew-covered roof.
- Angle Your Ladder Correctly: Set up your extension ladder on firm, level ground using the 4:1 ratio (for every 4 feet of height, the base should be 1 foot away from the wall).
- Maintain Three Points of Contact: Always keep two hands and one foot, or two feet and one hand, on the ladder as you climb.
- Inspect Roof Stability: Once you reach the roofline, gently check the roof deck. If the shingles or decking feel soft, spongy, or unstable, do not step onto the roof. This is a major sign of structural rot, and you should call us immediately.
- Never Step on the Skylight: It sounds obvious, but never sit, lean, or step on the glass or the acrylic dome. They are not designed to support human weight.
Planning Your Skylight Seal Replacement: Tools and Materials
A successful DIY skylight seal replacement relies on preparation. If you climb onto your roof only to realize you forgot the glass scraper, you’ll waste time and energy.

Before starting, gather these essential tools and materials:
- High-quality utility knife (with extra sharp blades)
- Stiff putty knife or caulk removal tool
- Heavy-duty caulking gun (with a smooth pressure release)
- Foam backer rod (essential for filling gaps wider than 1/4 inch)
- Isopropyl alcohol (90%+) and lint-free microfiber cloths
- Painter’s masking tape (1-inch width)
- Protective gloves and safety glasses
Choosing the Right Materials for Skylight Seal Replacement
Do not grab whatever cheap acrylic caulk you have sitting in your basement. Skylights expand and contract constantly as the New Jersey sun beats down on them. You need a high-performance, professional-grade sealant that can handle extreme temperature shifts without cracking.
We highly recommend using a 100% silicone sealant designed for exterior window and door applications. Silicone sealants offer Class 35 or Class 50 flexibility, meaning they can stretch and compress significantly without losing adhesion. If you want to dive deeper into selecting products, read this guide on selecting the best sealant for skylight repair.
For older, weathered skylight frames that need broader waterproofing, specialized translucent silicone coatings can be rolled over the entire frame transition. This creates a seamless, rubberized shield that keeps water out while still letting natural light pass through.
Fixed vs. Operable Skylight Considerations
The physical design of your skylight dictates how you approach the seal replacement:
- Fixed Skylights: These do not open. The leak is almost always at the glass-to-frame joint or where the frame meets the roof flashing.
- Operable Skylights: These open to let fresh air in. They rely heavily on rubber EPDM gaskets or weatherstripping along the sash. If your operable skylight is leaking, check the rubber gasket for dry rot, compression set, or tears. You may need to pull the old gasket out of its track and press in a matching replacement gasket.
- Curb-Mounted vs. Deck-Mounted: Curb-mounted units sit on a raised wooden box (curb) built onto the roof, while deck-mounted units sit flush with the roof deck. Curb-mounted units are easier to seal because the transitions are elevated above the water-shedding line of the shingles, but they require a perfect seal around the perimeter of the wooden curb.
If your skylight is double-paned and you notice fog, condensation, or water trapped between the glass layers, your factory insulated glass seal has failed. In this case, topical resealing won’t fix the cloudiness. You can learn more about this by reading our guide on fixing foggy double pane windows.
Step-by-Step Guide to Resealing Your Skylight
Now that you have your safety gear, tools, and the correct silicone sealant, it’s time to get to work. Choose a dry day when the temperature is between 40°F and 100°F. Silicone will not cure properly if it is too cold or if there is moisture in the air.
Step-by-Step DIY Skylight Seal Replacement
Step 1: Remove the Old Sealant
Using your utility knife, carefully score the edges of the old, cracked sealant. Hold the blade at a 45-degree angle to avoid scratching the glass or gouging the metal frame. Once scored, use your putty knife or a caulk removal tool to peel the old bead out of the joint. You must achieve at least 95% removal of the old material. New silicone will not bond to old, cured silicone or dirt.
Step 2: Clean the Joint Thoroughly
Brush away loose debris, leaves, and dust. Wipe the entire joint with a lint-free cloth soaked in isopropyl alcohol. This removes residual oils, grease, and microscopic dirt, raising the surface energy of the frame to ensure a strong chemical bond. Let the area dry completely for at least 15 minutes.
Step 3: Mask the Glass and Frame
For a clean, professional-looking finish, apply painter’s masking tape along the glass pane and the metal frame, leaving a 1/4-inch gap for the sealant joint. This keeps the silicone from smearing across your glass.
Step 4: Insert Backer Rod (If Needed)
If you are sealing a deep gap that is wider than 1/4 inch, do not fill the entire space with silicone. It will sag, shrink, and fail. Instead, press a foam backer rod into the gap. The backer rod acts as a joint filler and ensures the silicone only bonds to two sides (the glass and the frame), which allows it to stretch properly.
Step 5: Apply the Silicone Bead
Cut the nozzle of your silicone tube at a 45-degree angle to match the width of your joint. Insert the tube into your caulking gun. Holding the gun at a 45-degree angle, apply steady, consistent pressure to lay down a continuous, uniform bead of sealant. Avoid stopping and starting, as this creates weak spots in the seal.
Step 6: Tool the Joint Immediately
Silicone skins over quickly. Within 5 minutes of application, use a caulking tool or a gloved finger dipped in soapy water to smooth and shape the bead. Press the sealant firmly into the joint to eliminate air pockets and ensure complete contact with both surfaces.
Step 7: Peel the Tape and Let Cure
Carefully peel away the painter’s tape while the silicone is still wet. Pull the tape away at a 45-degree angle. Let the sealant cure undisturbed for 24 to 48 hours before exposing it to water.
Testing Your Repair for Water Tightness
Once the sealant has fully cured, you need to verify your work. Don’t wait for the next coastal storm to find out if your seal is watertight.
Perform a controlled, low-pressure water test:
- Have a helper stand inside the house directly under the skylight with a flashlight.
- Take your garden hose onto the roof.
- Turn the hose on to a gentle spray (mimicking steady rain—do not use a high-pressure jet).
- Begin spraying below the skylight first, focusing on the lower flashing.
- Slowly work your way up the sides, and finally spray the top edge and the glass-to-frame seal.
- Keep the water running on each section for 5 to 10 minutes while your helper watches for drips, dampness, or run-offs inside.
Repair vs. Full Replacement: Knowing the Difference
While a DIY skylight seal replacement is an excellent, cost-effective fix for minor leaks, it isn’t a cure-all. Sometimes, attempting to patch a failing unit is just throwing good money after bad.
Most residential skylights have a functional lifespan of 15 to 20 years. If your skylight was installed back in 2006, the materials have likely reached the end of their service life. Over two decades, constant exposure to UV rays, snow, and rain degrades the structural integrity of the frame and the glass seals.
If you are already replacing your roof, that is the absolute best time to replace your skylights. It is much easier and cheaper to integrate new flashing and waterproofing membranes when the surrounding shingles are already removed. For a complete guide on this process, you can read about how to replace a leaky skylight.
If your frame is in great shape but the glass itself is damaged or cloudy, you might not need a whole new skylight unit. Learn about your options for replacing foggy window glass or replacing sealed glass units.
Signs You Need a Full Replacement
If you notice any of the following red flags, stop patching and plan for a full skylight replacement:
- Cracked Glazing or Acrylic: Severe cracks in outer acrylic domes or tempered glass panes cannot be safely sealed. They pose a safety hazard and will eventually shatter.
- Deep Frame Rot or Corrosion: Wooden frames that are soft, moldy, or crumbling, or metal frames that are heavily rusted, can no longer support the weight of the glass or hold a watertight seal.
- Failed Insulated Glass Unit (IGU): If you have permanent fog, mineral stains, or standing water between the double panes, the hermetic seal of the insulated glass units has failed, destroying the unit’s energy efficiency.
- Repeated Leak Failures: If you have resealed the skylight multiple times and water continues to find a way inside, the leak is likely originating from failed underlayment or structural roof issues uphill from the unit.
When to Call a Professional Roofer
We love the DIY spirit, but some situations require specialized equipment, training, and experience. You should call in our local New Jersey experts at WindowServ if you encounter:
- Soft or Spongy Roof Decking: This indicates that water has rotted the plywood sheathing around your skylight, compromising the structural integrity of your roof.
- Complex Flashing Repairs: Replacing step flashing, counter flashing, or head flashing requires removing several courses of shingles and weaving new metal pieces into your roofing system. One wrong nail can create three new leaks.
- High-Pitched or Multi-Story Roofs: Working on steep slopes requires safety harnesses, roof jacks, and specialized fall-protection gear.
- Warranty Protection: If your skylight is still under manufacturer warranty, attempting a DIY repair can void your coverage. Professional repairs keep your warranty intact.
If you are trying to budget for professional help, take a look at our breakdown of window seal replacement costs to get a clear picture of what to expect.
Frequently Asked Questions About Skylight Leaks
Why does my skylight leak only during heavy rain?
If your skylight remains dry during light showers but drips during heavy downpours or wind-driven rain, you likely have a flashing or drainage issue. During heavy rain, water rushes down your roof in sheets. If leaves, twigs, or pine needles have built up on the uphill side of your skylight, they act as a dam, causing water to pool.
This standing water rises above the height of your flashing and seeps under the shingles. Wind-driven rain can also force water sideways, pushing it under loose flashing laps or worn weatherstripping that would normally shed water vertically.
How long does a skylight seal repair last?
A topical DIY seal repair using high-quality exterior silicone typically lasts 6 to 24 months if applied over old, poorly prepped surfaces. However, if you follow our guide—completely removing the old sealant, cleaning the joint with isopropyl alcohol, and applying a proper bead of 100% silicone—the repair can last 10 to 12 years. Eventually, UV radiation and thermal movement will cause the silicone to lose its elasticity, requiring another replacement cycle.
Can I use regular window caulk for a skylight?
No. Regular interior painters’ caulk, latex caulk, or cheap acrylic caulks should never be used on a skylight. These products lack the flexibility and UV resistance required to withstand the harsh conditions on a roof. They will dry out, shrink, crack, and peel away within a few months. Always use a high-performance, 100% exterior silicone sealant or a specialized hybrid polymer sealant designed to handle extreme weather, UV exposure, and constant thermal expansion.
Conclusion
A leaking skylight doesn’t have to mean a ruined ceiling or an expensive roof replacement. By taking the time to properly diagnose the issue, choosing high-performance silicone materials, and following a methodical, step-by-step sealing process, you can keep your home bright, dry, and energy-efficient.
The key to long-term success is regular maintenance. Clean the leaves and debris from around your skylight twice a year—ideally in the spring and fall—and inspect your sealant beads for early signs of cracking.
If you live in Bergen, Essex, Hudson, Middlesex, Monmouth, or Union County and find that your skylight leak is too high, too complex, or accompanied by structural wood rot, don’t risk your safety. Our team of local New Jersey specialists at WindowServ is always ready to help. We provide comprehensive repair and restoration solutions that save your original frames, improve your home’s energy efficiency by up to 30%, and come backed by our satisfaction guarantee.
Ready to get those skylights professionally inspected and repaired? Schedule professional window and skylight repair with WindowServ today, and let us stop the drop for good!