
Why Window Channel Balance Replacement Matters for Your Home Window channel balance replacement is the process of swapping out the worn spring-and-pulley mechanism inside your window frame that holds your
Why Window Channel Balance Replacement Matters for Your Home
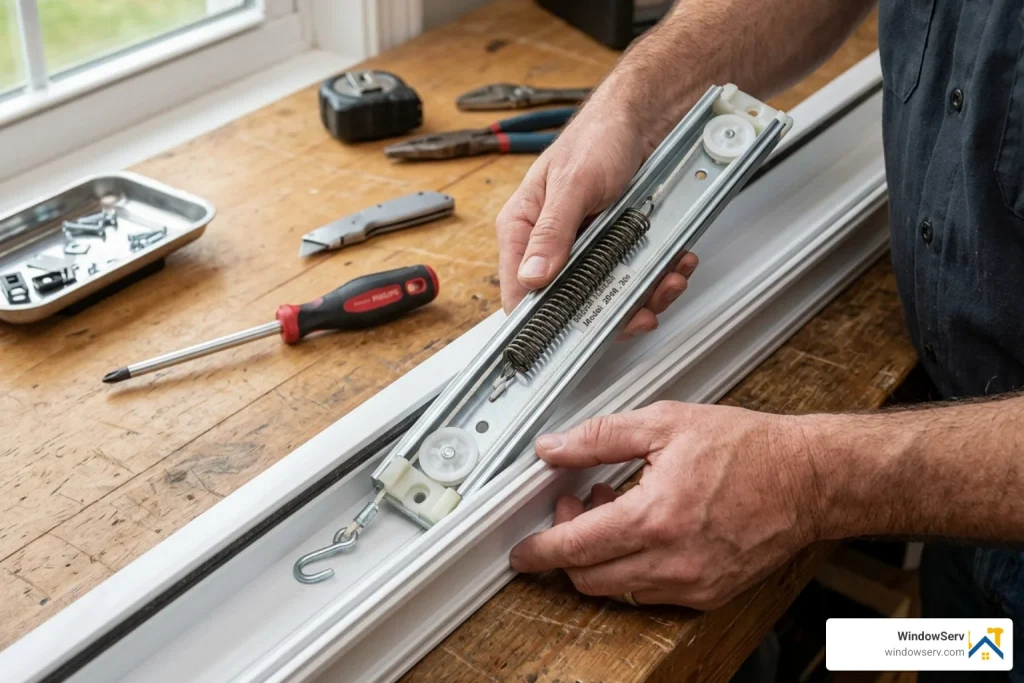
Window channel balance replacement is the process of swapping out the worn spring-and-pulley mechanism inside your window frame that holds your sash in place when open.
Quick answers for common searches:
-
What is a channel balance? A metal channel containing a spring, pulleys, and a cord that counteracts the weight of your window sash so it stays open and moves smoothly.
-
When do you need to replace it? When your window won’t stay open, slams shut on its own, or feels unusually heavy to lift.
-
How do you find the right replacement? Check the stamp number on your existing balance (like 2630 or 27-3) and measure its length.
-
Should you replace both sides? Yes — always replace in pairs to prevent binding and uneven wear.
-
Estimated cost range: Roughly $10–$55 per balance depending on series and size.
If your windows are suddenly hard to open, won’t stay up, or crash down without warning, a failed channel balance is almost always the culprit. These small but critical parts wear out over time — especially in older New Jersey homes where windows go through years of humidity, cold winters, and heavy use.
The good news? Replacing a channel balance is a manageable DIY job if you have the right part and the right steps. The tricky part is finding an exact match — wrong length, wrong spring strength, or wrong shoe type and your window still won’t work properly.
This guide walks you through everything: how to identify your balance, how to read those confusing stamp codes, and how to install the replacement correctly the first time.
Understanding Window Channel Balance Replacement Basics
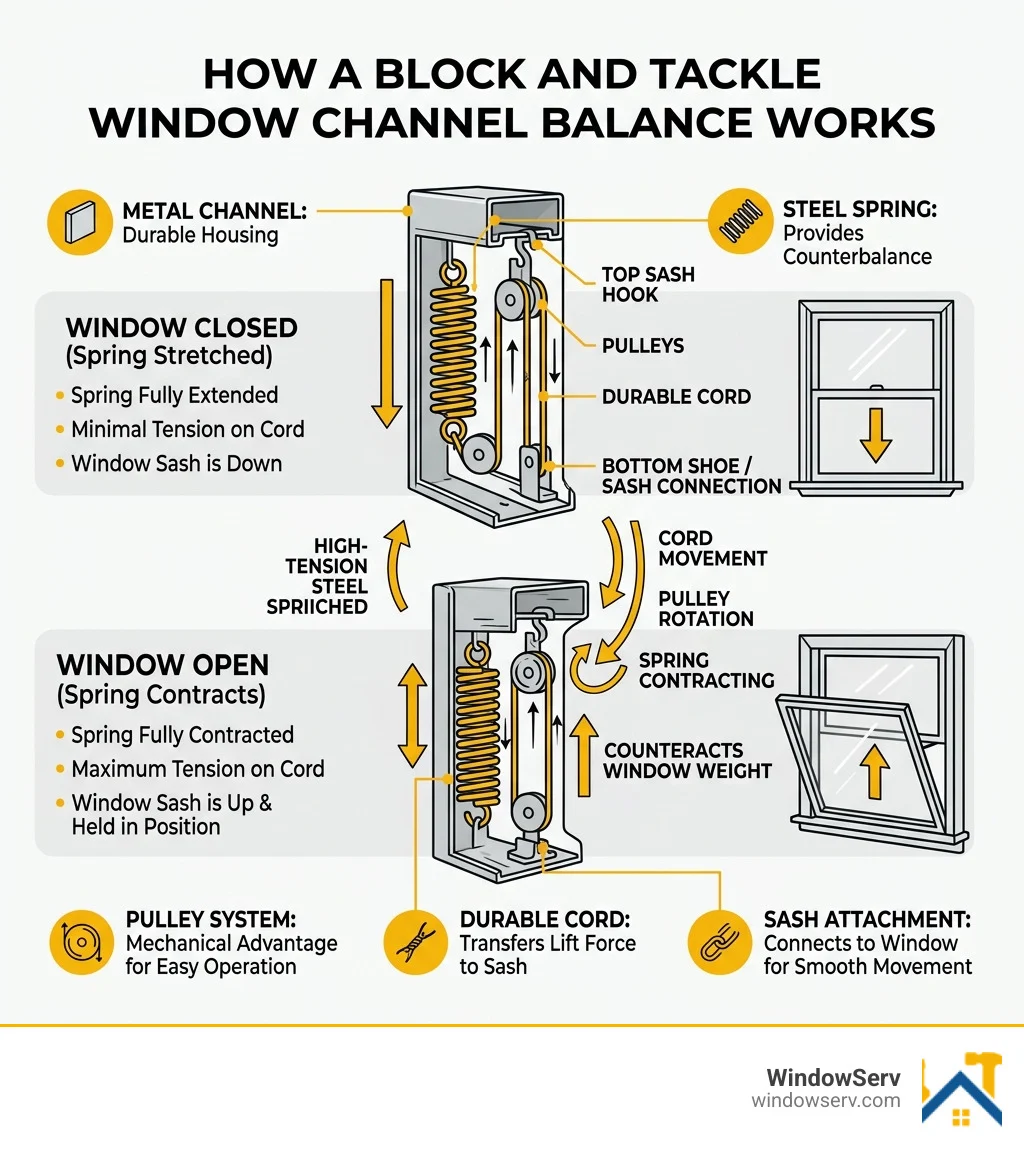
To master window channel balance replacement, we first need to look inside the “black box” of your window frame. A channel balance (often called a block and tackle balance) is a U-shaped metal channel that houses a high-tension steel spring and a series of pulleys. This system is connected to a cord that attaches to your window sash.
When you lift the window, the spring contracts, doing the heavy lifting for you. When you close it, the spring stretches. These are most commonly found in single-hung and double-hung vinyl or aluminum windows throughout New Jersey, from the historic brownstones of Hoboken to the modern suburban homes in Paramus.
How Long Do They Last?
Typically, these balances have a lifespan of 10 to 15 years. However, environmental factors like salt air in Monmouth County or heavy industrial dust in parts of Essex County can cause the pulleys to seize or the cords to fray prematurely. Friction is the enemy here; once the internal lubrication dries out, the spring has to work harder, leading to “spring fatigue” where the metal loses its resilience.
If you notice your window is starting to feel like a gym workout just to get some fresh air, it’s time for Window Repair. Catching it early can prevent the sash from crashing down and cracking the glass, which moves the project from a simple part swap to a full Window Restoration.
Identifying the Correct Window Channel Balance Replacement Part
Identification is 90% of the battle. You cannot simply walk into a hardware store and ask for “a window spring.” There are hundreds of variations. To get the right match, we need to look at three specific factors: the length of the metal channel, the series (width and shape), and the plastic ends.
-
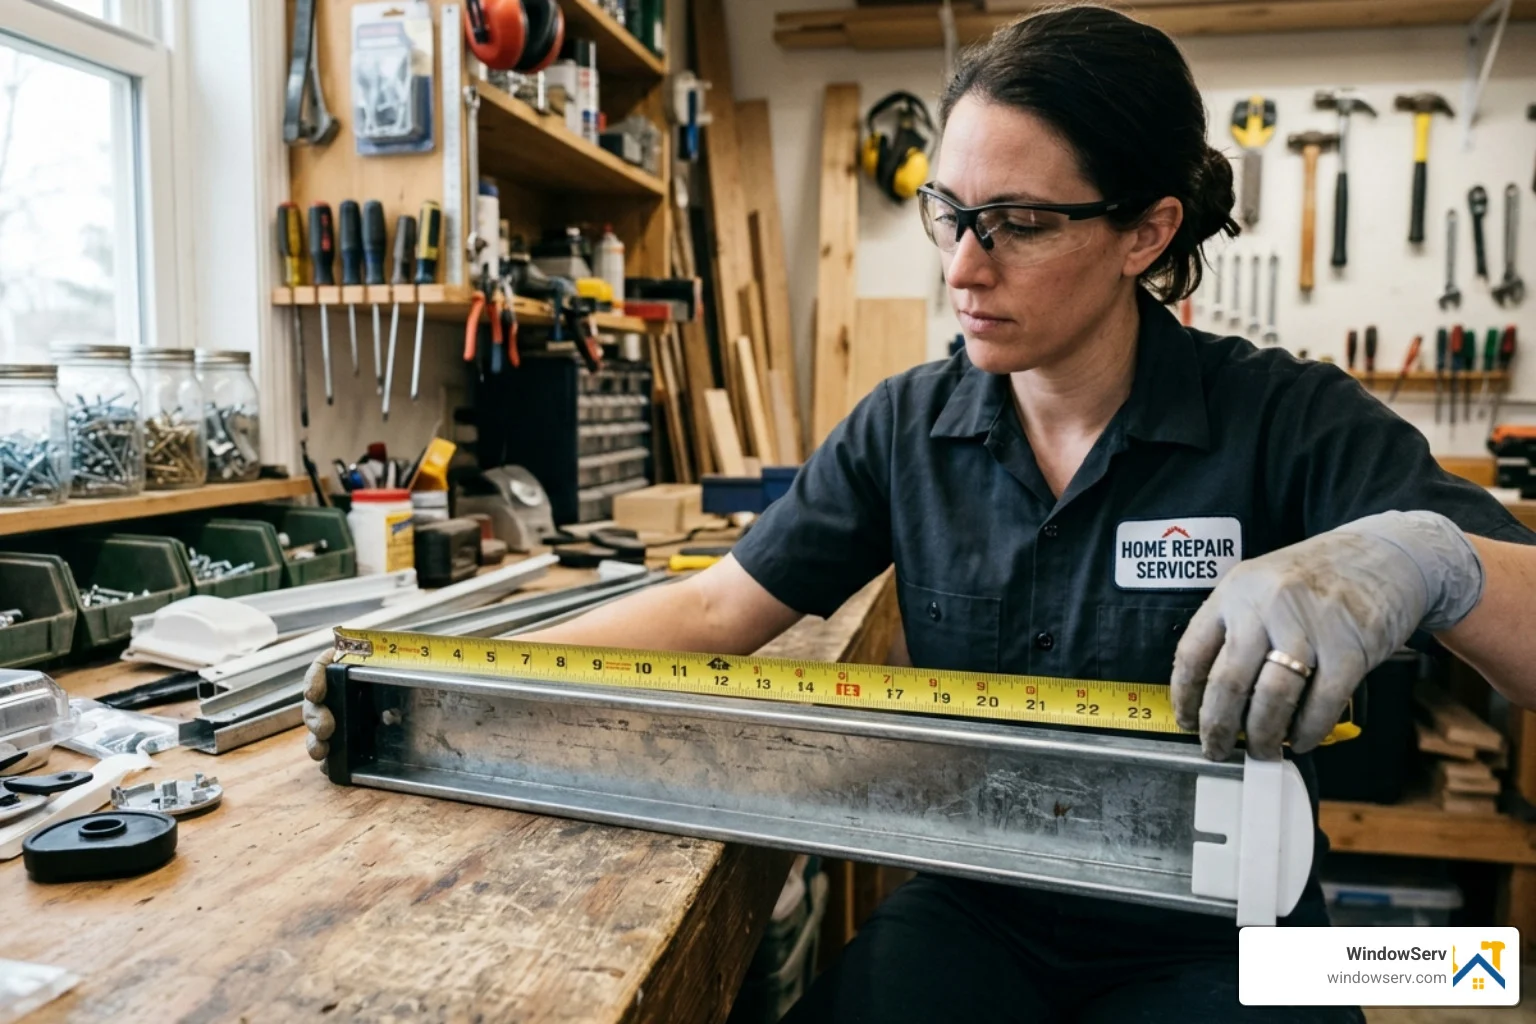
Measure the Metal: Measure the length of the metal channel only. Do not include the plastic ends in this measurement. Common lengths range from 15″ to 34″.
-
Check the Width: Most standard channels are 9/16″ wide (often referred to as 1/2″ in the trade).
-
Identify the Series:
-
60 Series: The most common type in the U.S. today, usually 5/8″ deep.
-
64 Series: A slimmer version, often around 3/8″ wide, used in specific narrow-frame windows.
-
61 Series: Often called “hemmed” balances because the edges of the metal are folded over for strength. A popular example is the Hemmed Channel Balance 61-212, which is 22 inches long and supports 8–12 lbs.
-
Decoding Stamp Numbers and Shoe Types
On the side of your metal channel, you’ll find a stamped code. This is the “DNA” of your balance. It tells us the length and the weight capacity of the internal spring.
-
Four-Digit Codes (e.g., 2630): The first two digits (26) usually represent the length (26 inches), and the last two (30) represent the weight class.
-
Dash Codes (e.g., 27-3): Similar to the above, the “27” is the length, and the “3” is the weight code.
What do these weight codes mean? A “30” or “-3” code doesn’t mean the window weighs 30 pounds. It refers to a specific weight range. For example, a Prime-Line 27-inch balance with a 2630 stamp is designed to support a sash weight between 13 and 19 pounds. If your sash weighs 25 pounds and you use a 2630 balance, the window will simply slide back down.
The “Shoe” and “Top”: The plastic pieces at the ends are just as important. The “shoe” is the piece at the bottom that connects to the sash. In tilt windows, this is often a “pivot shoe” with a cam that locks when the window is tilted in. If you have a 35A Tilt Window Channel Balance, it likely uses a specific shoe like the 64T-506 to ensure the tilt mechanism functions safely.
Series Common Width Edge Style Typical Application 60 Series 9/16″ Plain Standard Non-Tilt Windows 61 Series 9/16″ Hemmed Heavy-Duty Non-Tilt 64 Series 3/8″ Ribbed Narrow Profile Tilt Windows
Step-by-Step Window Channel Balance Replacement Guide
Before we dive in, let’s talk safety. These balances are under high spring tension. If a cord snaps or a tool slips, that metal channel can fly out with enough force to cause injury or break a window pane. Always wear safety glasses and keep a firm grip on your tools.
Tools Needed for Window Channel Balance Replacement
You don’t need a massive workshop for this, but the right hand tools are non-negotiable:
-
Phillips Head Screwdriver: For removing the stop or the screw holding the balance in place.
-
Flathead Screwdriver: Essential for twisting the pivot shoe cam to release or lock tension.
-
Safety Glasses: To protect against snapping cords or flying debris.
-
Sash Removal Tool (Optional): Helpful for older windows, though a sturdy flathead usually does the trick.
If you find that your window is just slightly “off” and doesn’t need a full part swap, a simple Window Adjustment might be all that’s required to get it back on track.
Installation Process for Tilt and Non-Tilt Windows
The process differs slightly depending on whether your windows “tilt in” for cleaning or stay fixed in the tracks.
For Non-Tilt Windows:
-
Remove the Sash: Raise the window and remove the “take-out clips” (small metal or plastic tabs) on both sides of the frame. Pull the sash up until it disengages from the balances, then pull it out of the frame.
-
Unscrew the Balance: Locate the screw at the very top of the metal channel. Unscrew it carefully, keeping a hand on the channel so it doesn’t drop.
-
Install New Balance: Hook the new balance into the frame (or screw it in at the top) and ensure the cord is properly seated.
-
Replace Sash: Slide the sash back into the tracks and push down until it engages with the balance hooks.
For Tilt Windows:
-
Tilt and Lift: Raise the window about 3 inches. Pull the tilt latches and swing the window in toward you until it is horizontal. Lift one side up to pop the pivot bar out of the shoe.
-
Release Tension: This is the critical part. Use a flathead screwdriver in the pivot shoe cam. Turn it 90 degrees to “unlock” it from the track. Warning: The shoe will want to shoot upward because of the spring tension. Hold it firmly and let it slide up slowly until the tension is gone.
-
Swap the Balance: Unscrew the old balance, pull it out, and screw the new one in.
-
Reset the Shoe: Pull the new shoe down to the appropriate height (usually 3-4 inches from the bottom) and turn the cam 90 degrees with your screwdriver to lock it in place.
-
Reinstall Sash: For the best results, use a Channel Balance for Tilted Windows designed for your sash’s specific weight. Reinsert the pivot bars into the shoes and tilt the window back up.
If the internal hardware of the sash itself is damaged during this process, you may need a Window Sash Replacement to ensure the new balances have a solid point of attachment.
Selecting the Right Strength and Weight Capacity
One of the most common questions we get in Bergen and Hudson County is: “Can’t I just buy the strongest spring so it lasts longer?”
The answer is a firm no.
Window balances are a delicate scale. If the spring is too weak, the window won’t stay open. If the spring is too strong, the window will “jump” up when you try to open it, or worse, it will be nearly impossible to close, putting immense strain on the plastic lock components.
How to Weigh Your Sash
If your stamp is missing or unreadable, you must weigh the sash.
-
Remove the sash from the window.
-
Step on a standard bathroom scale, then step on it again while holding the sash.
-
The difference is your sash weight.
Common Weight Ranges:
-
Lightweight: 8–12 lbs (Common for small bathroom windows).
-
Standard: 13–19 lbs (Typical for bedroom/kitchen windows).
-
Heavy Duty: 23–28 lbs (Large double-pane windows).
Always check the manufacturer’s chart. For instance, a 28-inch balance might support 23–28 lbs, while a 35″ Series 770 Balance might have options ranging from “35B” (16–22 lbs) to “35E” (32–34 lbs).
The Importance of Pairs
We always recommend replacing window balances in pairs. Even if only one side is broken, the other side has likely suffered the same amount of “cycles” and is near the end of its life. More importantly, a new spring has a different “rate” than an old, stretched-out spring. If you replace only one, the window will lift unevenly, causing it to bind in the tracks and potentially damaging the frame. This is a core part of professional Window Spring Replacement.
Common Mistakes to Avoid During Installation
Even with the right parts, things can go wrong. Here are the “gotchas” we see most often during window channel balance replacement in the field:
-
Mismatched Shoe Depth: Some shoes are 1″ deep, others are 1-1/4″. If the shoe is too deep, it won’t fit in the track; if it’s too shallow, it will wobble and eventually pop out.
-
Ignoring the Guides: The plastic guides at the top and bottom of the channel keep the balance centered. If these are cracked, don’t reuse them. It’s worth the extra couple of dollars to buy a balance with the guides pre-attached.
-
Over-tensioning: For spiral balances (a cousin to the channel balance), people often over-wind the spring. For channel balances, the “tension” is set by the spring’s physical properties, so the mistake here is usually choosing the wrong weight class.
-
Forcing the Sash: If the sash doesn’t slide back in easily, stop. You likely have a pivot shoe that isn’t perfectly level with the one on the other side.
If you run into trouble, don’t force it. Modern vinyl windows are held together by precision-engineered plastic parts that can snap in cold weather. Professional Window Installation experts have the specialized tools to reset these systems without cracking the delicate vinyl tracks.
Frequently Asked Questions about Window Balances
Can I repair a channel balance instead of replacing it?
Generally, no. While you can buy “repair kits” that include new cords or pulleys, the core of the balance—the spring—cannot be repaired once it has lost its tension or developed “flat spots.” Given that a new balance typically costs between $15 and $30, the time and effort required to restring an old, fatigued balance usually isn’t worth it. The only exception is if you have a very rare, obsolete balance where a replacement isn’t available.
Why must balances be replaced in pairs?
Think of it like the tires on your car. If you replace only one tire, the car pulls to one side. In a window, the sash needs equal upward pressure from both the left and right sides to stay level. If one side is “stronger” (newer), the sash will tilt slightly as it moves, leading to friction, squeaking, and eventually, the sash getting stuck or the pivot bars breaking.
How long do window channel balances typically last?
In the New Jersey climate—with our humid summers and freezing winters—you can expect about 10 to 15 years of reliable service. You’ll know they are failing if:
-
The window feels heavier than it used to.
-
You hear a “crunching” or “popping” sound inside the frame.
-
The window drops an inch or two after you open it.
-
You see a frayed cord or a loose spring peeking out from the side of the sash.
Conclusion
Mastering window channel balance replacement is one of the best ways to extend the life of your home’s windows. By correctly identifying your balance series, decoding the stamp numbers, and replacing your hardware in pairs, you ensure your windows remain safe, energy-efficient, and easy to operate.
However, we know that life in New Jersey is busy. Between commuting from Jersey City or managing a household in Summit, you might not have the afternoon to spare wrestling with high-tension springs and window sashes. That’s where we come in.
At WindowServ, our local NJ experts specialize in Window Balance Replacement and Repair. We bring the parts, the tools, and the experience to handle everything from a single sticky window in Westfield to a full house of upgrades in Montclair. Our solutions focus on saving your original frames—saving you money and hassle—while providing up to 30% energy savings through proper window sealing and operation.
Ready to stop fighting with your windows? Contact us today for professional service backed by a satisfaction guarantee. Whether you’re in Bergen, Essex, Hudson, or beyond, we’re here to make your windows work like new again.