
Why Fixing Double Hung Windows Is Worth Your Time (and Money) fixing double hung windows Fixing double hung windows is something most New Jersey homeowners can tackle themselves — or
Why Fixing Double Hung Windows Is Worth Your Time (and Money)
Fixing double hung windows is something most New Jersey homeowners can tackle themselves — or at least understand well enough to know when to call a pro.
Here’s a quick answer to the most common questions:
| Problem | Most Likely Cause | Quick Fix |
|---|---|---|
| Window won’t stay up | Broken balance or worn sash cord | Replace balance or restring cord |
| Window painted shut | Paint sealed around stop or sash | Score with utility knife, pry gently |
| Drafts around frame | Worn or missing weatherstripping | Install new weatherstripping or storm window |
| Sash won’t lock | Misaligned sash or broken hardware | Realign sash, replace lock |
| Window slams shut | Failed spring or spiral balance | Replace balance cartridge |
| Rotted wood or foggy glass | Age, moisture, seal failure | Epoxy repair or sash replacement |
Old double-hung windows get a bad reputation. People assume they’re past saving. But that’s rarely true.
Original wood windows — especially those built before 1960 — were made from dense, slow-growth lumber that modern replacements simply can’t match. With the right repairs, they can last another 100 years. A full professional restoration can run $1,000–$2,000 per window, but a solid DIY repair typically costs under $50 in materials.
The balance system is the most common failure point. When it goes, your sash slams shut, refuses to stay open, or becomes nearly impossible to lift. But that’s a fixable problem — not a reason to replace the whole window.
I’m Feiruz Gabibov, Chief Operating Officer of WindowServ, a New Jersey-based window repair and maintenance company, and I’ve overseen hundreds of fixing double hung windows projects across the state — from simple balance replacements to full historic restorations. In this guide, I’ll walk you through everything you need to know to get your windows working properly again.
Understanding the Anatomy and Common Problems of Double-Hung Windows
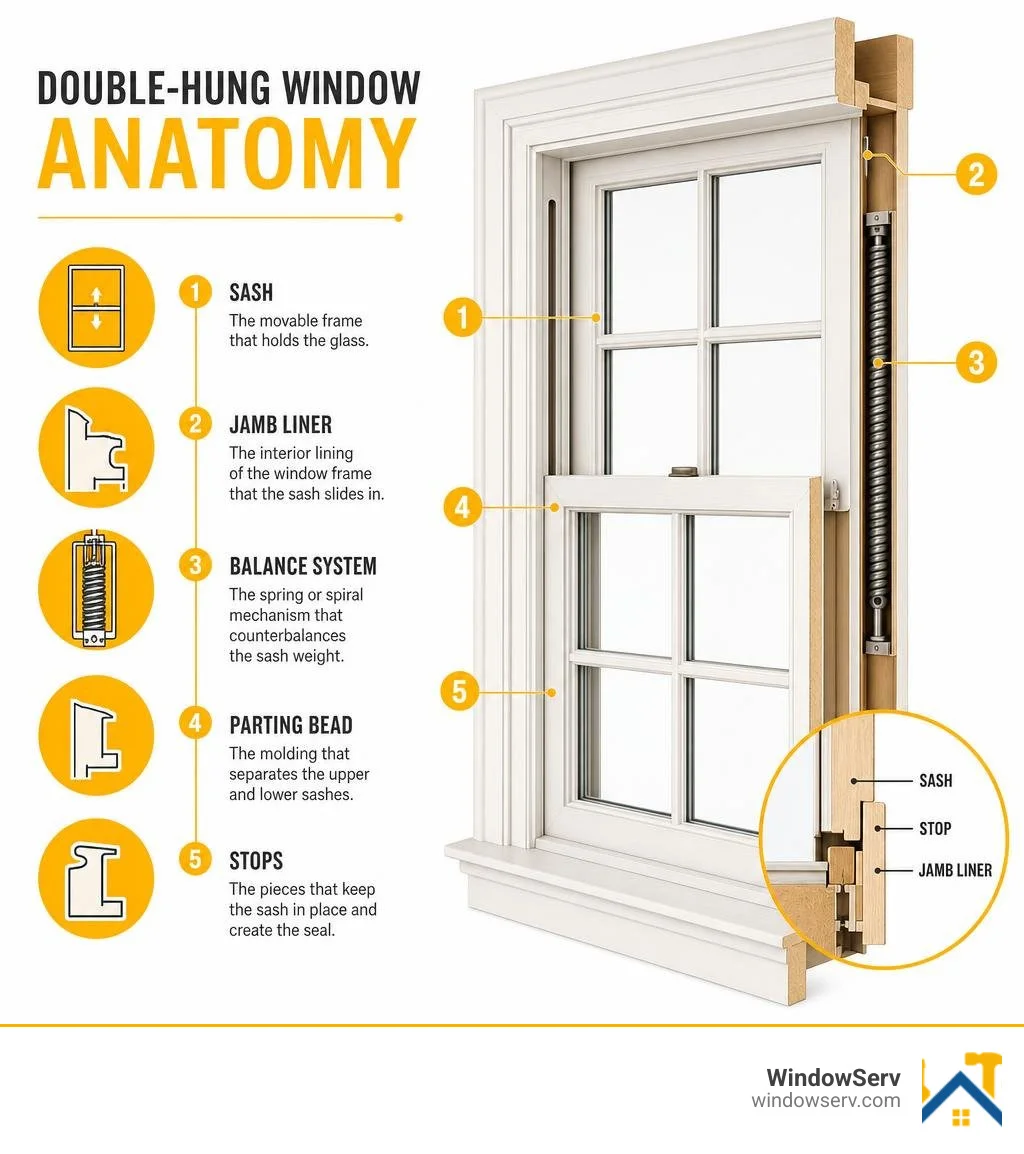
Before we grab our tools and start prying things apart, we need to understand exactly how a double-hung window is put together. If you don’t know your parting bead from your window stop, you might end up damaging the historic fabric of your home.
A double-hung window consists of two moving sections called sashes: an upper sash and a lower sash. These sashes slide vertically within the window frame. They are held in place laterally by wood trim pieces called the window stop (on the interior side) and the parting bead (the thin strip of wood separating the upper and lower sash channels). On modern windows or retrofitted older ones, you will often find a vinyl jamb liner running up the sides of the frame, which houses the spring-loaded mechanisms that balance the weight of the sashes.
When we talk about fixing double hung windows, we usually run into a handful of classic problems:
- The Window is Painted Shut: Over years of careless repainting, paint accumulates in the seams between the sash, the stops, and the parting bead, gluing the window firmly in place.
- Drafts and Rattles: As wood shrinks or weatherstripping wears away, gaps open up. This allows cold air from New Jersey winters to pour into your living room, sending your heating bills through the roof.
- The Sash Won’t Stay Up: This is the classic “guillotine window” problem. When you lift the window, it immediately falls back down or slams shut with a terrifying crash. This is almost always caused by a failure in the balance system.
To diagnose why your window won’t stay up, you first need to identify which type of balance system you have. Here is a handy comparison table of the four main balance systems found in New Jersey homes:
| Balance Type | How to Identify It | Common Failure Points | Repairability |
|---|---|---|---|
| Rope and Weight | Found in historic homes. Uses cotton cords or metal chains running over pulleys at the top of the frame into hidden wall pockets. | Snapped cotton sash cords; disconnected or jammed cast-iron weights. | Highly repairable. You can easily replace cords with high-quality cotton rope. |
| Spiral Balance | Metal tubes visible in the side tracks. A spiral rod extends out of the bottom of the tube and connects to the sash. | Loss of spring tension; worn-out internal plastic components. | Moderate. Can often be tensioned with a specialized tool or replaced entirely. |
| Block-and-Tackle | Hidden inside vinyl jamb liners. Uses a combination of a small extension spring and a series of nylon cords and pulleys. | Snapped nylon cords; broken plastic locking terminals or brackets. | High. You can replace the individual cartridge or the broken plastic terminal. |
| Constant-Force | Uses a coiled stainless steel spring band (like a tape measure) housed in a plastic shoe that slides in the track. | Cracked plastic shoes; rusted or broken steel spring bands. | Low. These are not adjustable or repairable; you must replace the balance spring assembly. |
If your balance system is failing, you are likely dealing with a broken spring or cord. To understand how to tackle this specific issue, check out our guide on Double Hung Window Balance Repair. For a broader look at structural repairs on the sash itself, you can read about How to Repair Double Hung Sash Windows – Fenster Components.
The Step-by-Step Guide to Fixing Double Hung Windows
Now that we know what we are looking at, let’s roll up our sleeves and walk through the physical repair process.
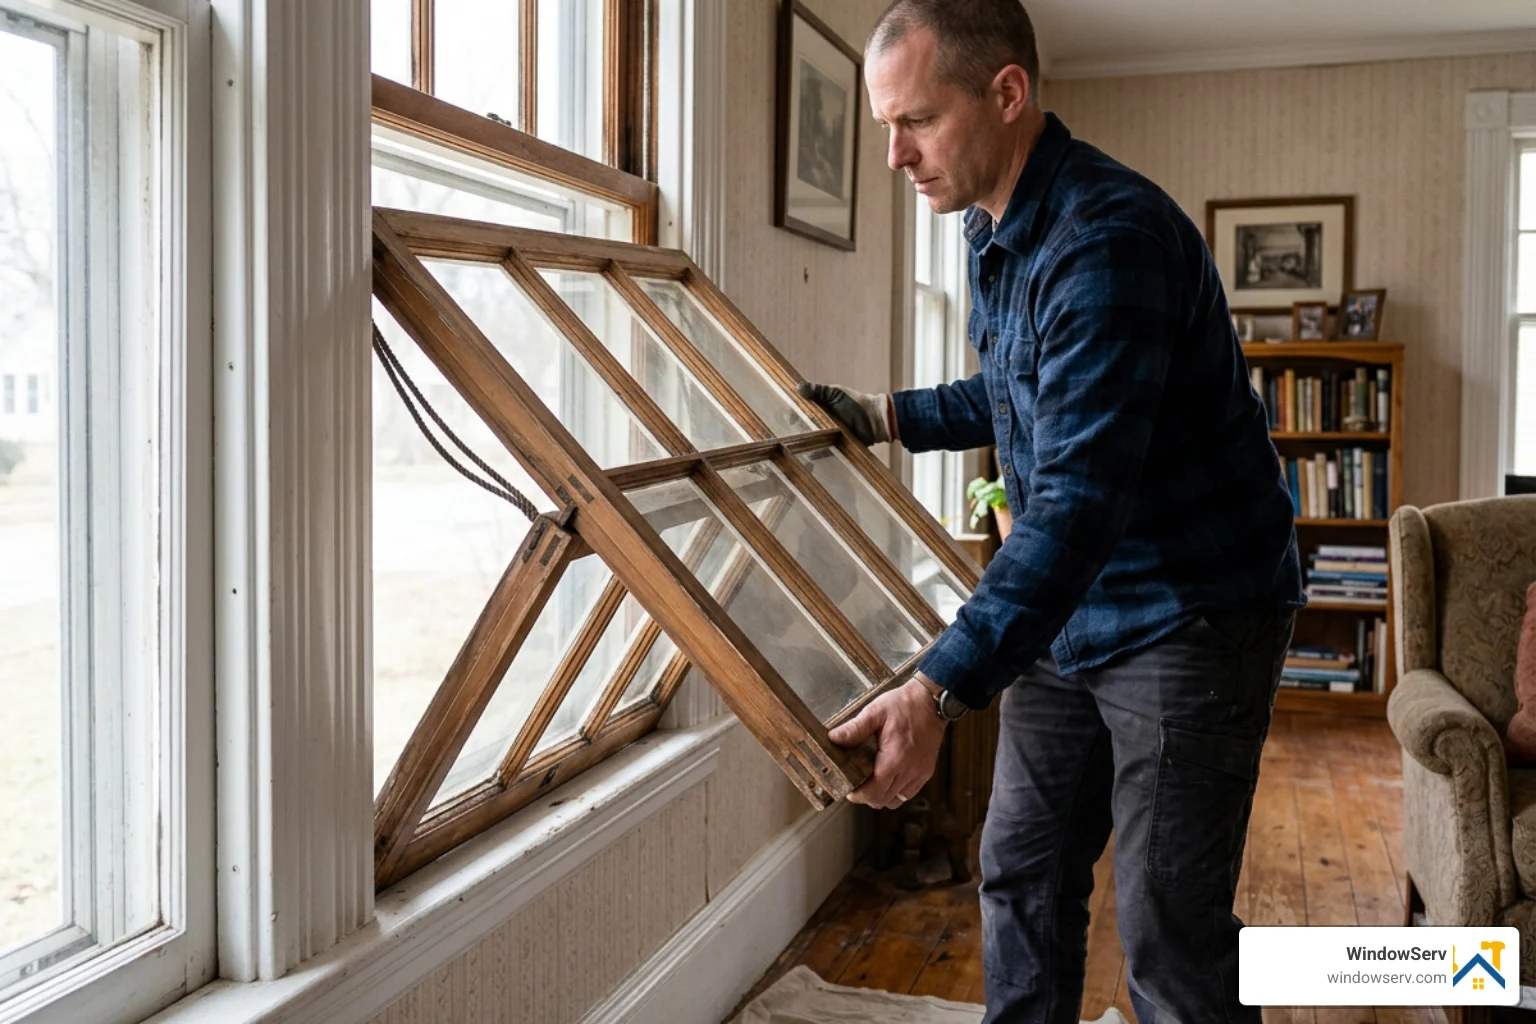
Whether you are replacing a broken balance, swapping out worn weatherstripping, or preparing to restore rotted wood, the first and most critical step is safely removing the window sashes.
Step 1: Score and Release Painted-Shut Sashes
If your window is painted shut, do not force it open with a pry bar, or you risk shattering the glass or splitting the wood. Take a sharp utility knife and carefully score the paint seam along the interior window stops, the meeting rail (where the two sashes lock), and the exterior parting bead. Once scored, use a stiff putty knife or a specialized sash saw to gently break the paint bond.
Step 2: Remove the Interior Stops
The interior stops are the vertical wood strips on the inside of the frame that keep the lower sash in its track. Using a thin pry bar and a putty knife (to protect the frame), gently pry the stops away from the frame. Start from the middle and work your way to the top and bottom. Number these pieces so you know exactly where they go during reassembly.
Step 3: Remove the Lower Sash
Once the stops are off, the lower sash can swing inward toward the room.
- For Rope-and-Weight Windows: Lift the sash slightly, swing it out, and carefully untie or unscrew the sash cords from the sides of the sash. Tie a figure-eight knot in the cord or clamp it with locking pliers so the heavy iron weight doesn’t crash down inside the pocket.
- For Modern Tilt-In Windows: Raise the lower sash a few inches, slide the tilt latches toward the center, tilt the sash toward you to a 90-degree angle, and lift one side to disengage the pivot pin from the balance shoe.
Step 4: Remove the Parting Bead and Upper Sash
To get the upper sash out of a traditional wood window, you must remove the parting bead. This is a thin strip of wood tapped into a groove in the frame. Use a pair of pliers or a block of wood and a hammer to gently tap it out. Once the parting bead is removed, the upper sash can be lowered, swung into the room, and disconnected from its cords or balances.
Step 5: Remove the Jamb Liners (If Applicable)
If your window has vinyl jamb liners instead of bare wood tracks, use a putty knife to release the internal flanges holding the liners to the frame, then gently slide the entire liner assembly out. Be careful — if the spring-loaded balances inside are under tension, they can snap up violently. Always wear safety glasses!
Once your sashes are out, it is the perfect time to address drafts. You can significantly boost your home’s thermal efficiency by consulting our Window Weatherstripping Replacement Guide and following the expert techniques detailed in How to Weatherstrip Double Hung Windows – This Old House.
Essential Tools and Safety Gear for Fixing Double Hung Windows
Before you begin any window repair project, you must gather the right tools and, more importantly, prioritize safety. This is especially true if you live in an older New Jersey home.
Any home built before 1978 is highly likely to contain lead-based paint. Friction surfaces — like the sliding tracks of a double-hung window — are primary sources of dangerous lead dust. When fixing double hung windows, you must assume lead paint is present unless you have tested it and proven otherwise.
To work safely around lead paint, you need the following personal protective equipment (PPE) and containment gear:
- A P100-rated or HEPA-rated respirator mask (not a simple paper dust mask)
- Heavy-duty safety glasses
- Sturdy, rubberized gloves
- 6-mil plastic sheeting to lay under your work area to catch paint chips and dust
- A HEPA-rated vacuum cleaner (standard shop vacs will simply blow fine lead dust back into the air)
- A spray bottle filled with water to wet down surfaces before scraping (wet scraping prevents lead dust from becoming airborne)
Here is a quick checklist of the essential hand tools you will need for the repair itself:
- Stiff putty knife: For breaking paint seals and prying trim.
- Utility knife: For scoring paint and cutting weatherstripping.
- Flathead and Phillips screwdrivers: For hardware and balance screws.
- Small trim pry bar: For removing stops and parting beads without breaking them.
- Locking pliers (Vise-Grips): Crucial for holding spring balances under tension.
- Hammer and nail set: For re-securing wood stops.
- Sash cord or chain: If you are working on historic weight-and-pulley systems.
Replacing and Repairing Different Balance Systems
Once you have the window disassembled, you can address the root cause of the “dropping window” problem: a failed balance system. Let’s look at how to fix or replace the most common types.
Restringing Rope-and-Weight Systems
If a cotton sash cord has snapped, you will need to access the weight pocket inside the wall. Look for a small, rectangular access door on the lower part of the side jamb, usually held in place by a single screw. Remove the door, retrieve the cast-iron weight from the bottom of the pocket, and pull out the old rope.
Feed a new, high-quality cotton sash cord (like size #8 Samson Spot Cord) over the pulley at the top of the window and let it drop down into the pocket. Tie the rope securely to the cast-iron weight using a reliable bowline knot, then pull the rope taut. Cut the rope to length — it should be long enough to allow the weight to hang suspended just above the bottom of the pocket when the sash is fully closed. Tie a knot at the other end and secure it into the groove on the side of the wooden sash.
Replacing a Block-and-Tackle Cartridge
If your modern vinyl window balance has snapped or lost its tension, you will need to replace the block-and-tackle cartridge. Look for the glass size code stamped on the side of the metal cartridge. This code tells you the exact weight capacity you need to order for a replacement.
Once you have the new cartridge, compress the spring, secure the cord with locking pliers, and slide the assembly into the vinyl jamb liner. Make sure the shorter S-clip hook is positioned on the exterior side of the track. If you are dealing with a broken spring or tension coil in a modern window, read our specialized guides on Block and Tackle Window Balance Replacement and Double Hung Window Balance Spring Replacement for detailed, step-by-step instructions.
Restoring Wood, Reglazing Glass, and Painting Sashes
If your home features original wood windows, fixing the mechanical balance is only half the battle. Over decades of exposure to the humid New Jersey summers and freezing coastal winters, the wood sash can rot, and the glazing putty holding the glass panes in place can crack and fall away.
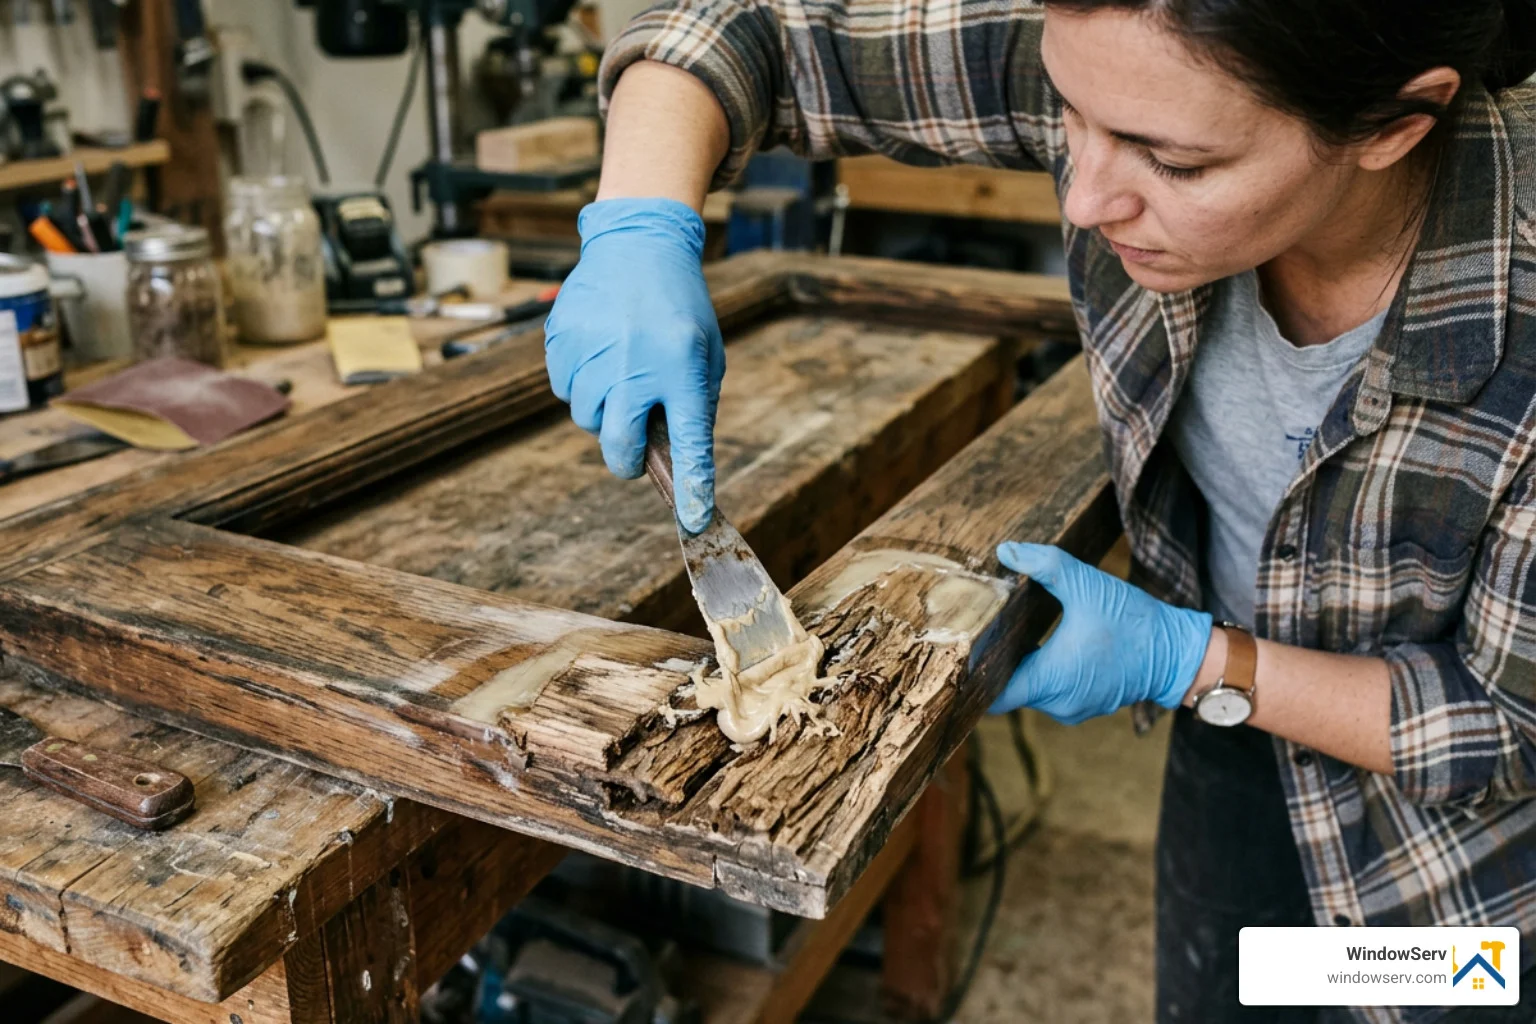
Repairing Rotted Wood with Epoxy
You don’t need to throw away a historic sash just because a corner of the rail has some rot. You can easily rebuild it using a two-part structural epoxy system (like Abatron LiquidWood and WoodEpox).
First, scrape away all the soft, rotted wood until you reach solid, dry timber. Apply the liquid epoxy consolidant to penetrate and strengthen the remaining wood fibers. Once the consolidant has cured, mix the two-part epoxy wood putty and pack it into the void. Shape it roughly with a putty knife, leaving it slightly proud of the surface. Once fully cured, you can sand, carve, drill, and paint the epoxy just like real wood. For more details on this process, explore our resources on Wooden Sash Window Repairs.
Re-Glazing the Glass Panes
Traditional wood sashes do not use rubber gaskets to hold glass; they use glazing points and oil-based glazing putty. If your putty is cracked or missing, water will seep behind the glass and rot the wood.
To re-glaze a sash:
- Carefully scrape away the old, brittle putty using a chisel or a specialized steam box to soften it.
- Remove the metal glazing points (the tiny metal triangles holding the glass in place).
- Clean the wood rabbet (the groove where the glass sits) and coat it with an oil-based primer to prevent the dry wood from sucking the oils out of the new putty.
- Apply a thin bead of putty in the groove, press the glass pane firmly into the bed, and tap in new glazing points every 6 to 8 inches.
- Roll out a rope of fresh glazing putty, press it into the corner at a 45-degree angle, and smooth it with a glazing knife to create a clean, mitered bevel. Let the putty cure for several days before priming and painting.
How to Paint a Window Sash Correctly
When it is time to paint, there is one golden rule you must follow: Never paint the sides of the sash that slide in the jamb channels!
Painting these friction surfaces will cause the window to stick, bind, and eventually become painted shut again. Apply two coats of high-quality exterior enamel paint to the interior and exterior faces of the sash, but leave the sliding edges bare wood. You can rub a block of paraffin wax or apply a coat of high-gloss marine enamel to the bare wood tracks to ensure the sashes slide smoothly. For a deep dive into professional-grade restoration techniques, read Refurbishing Old Double-Hung Windows – Fine Homebuilding.
When to Call a Professional for Fixing Double Hung Windows
While many double-hung window repairs are highly manageable DIY projects, there are times when you should put down the putty knife and call in the experts.
You should seek professional help if you encounter:
- Severe Structural Rot: If the rot has spread from the sash into the main window frame or the sill, the structural integrity of your wall could be compromised. This requires advanced carpentry and frame rebuilding.
- Out-of-Square Frames: If you measure your window frame diagonally from corner to corner and the measurements differ by more than 1/8 inch (for small windows) or 1/4 inch (for large windows), your frame is out of square. Sashes will bind, stick, or leave massive drafty gaps, and adjusting them requires professional shimming.
- Extensive Lead Abatement: If you have young children or pregnant women in the home and your windows are shedding large amounts of flaking lead paint, professional, certified lead abatement is the safest choice.
- Historic Preservation Requirements: If you live in a designated historic district in New Jersey (such as parts of Hoboken, Jersey City, or Montclair), local building codes may strictly regulate how your windows can be repaired or restored.
If you suspect your window frame is structurally compromised, read our comprehensive Window Frame Repair Guide 2026 to help you decide on the best course of action.
Frequently Asked Questions About Double-Hung Window Repair
Why won’t my double-hung window stay up?
The most common reason a double-hung window won’t stay up is a failed balance system. In older homes, this is usually due to a snapped cotton sash cord, which disconnects the sash from the heavy iron weights hidden in the wall. In modern vinyl or wood-clad windows, it is typically caused by a broken spring inside a block-and-tackle cartridge, a rusted constant-force spring, or a spiral balance that has lost its tension. Additionally, if you recently tilted your window in for cleaning, the sash may have simply slipped out of its plastic pivot shoes in the track.
Is it better to repair or replace old double-hung windows?
In almost all cases, repairing original wood windows is superior to replacing them. Historic windows built before 1960 were constructed from old-growth lumber, which is incredibly dense, rot-resistant, and can last indefinitely if maintained. Modern replacement windows, on the other hand, rely on insulated glass units (IGUs) that typically experience seal failure and fogging within 10 to 20 years, necessitating complete replacement. While a DIY repair costs under $50, a cheap replacement window can look out of place and fail quickly.
How do I safely handle lead paint during window repairs?
To handle lead paint safely, always follow EPA Renovation, Repair, and Painting (RRP) guidelines. Lay down 6-mil plastic sheeting to contain paint chips, wear a P100 HEPA respirator, and use a spray bottle to wet down the wood before scraping or sanding. Wetting the wood prevents toxic lead dust from flying into the air. Clean your entire workspace with a certified HEPA vacuum and wet-mop all hard surfaces when finished. Never use high-heat guns (over 1,000°F) or dry sanders, as they vaporize lead and create highly toxic fumes.
Conclusion
Fixing double hung windows is one of the most rewarding home improvement projects you can undertake. By choosing to restore rather than replace, you preserve the architectural character of your home, keep high-quality old-growth wood out of New Jersey landfills, and save thousands of dollars in the process. When combined with proper weatherstripping and a high-quality storm window, your restored historic windows can meet or even exceed the energy efficiency of brand-new replacements.
However, window restoration can be time-consuming, and dealing with lead paint, structural rot, or complex balance systems requires a high level of precision. If you find yourself facing warped frames, extensive rot, or simply don’t have the weekend to spare, we are here to help.
At WindowServ, we are your local New Jersey window restoration and repair experts. We serve homeowners across Bergen, Essex, Hudson, Middlesex, Monmouth, and Union counties — including Hoboken, Jersey City, Ridgewood, Montclair, and beyond. Our comprehensive repair and restoration solutions save your original frames, improve your home’s energy efficiency by up to 30%, and come backed by our satisfaction guarantee.
Don’t let drafty, stuck, or slamming windows ruin your home’s comfort. Contact us today to schedule your professional consultation, or visit our main page to learn more about our expert Window Repair services!