
Window well material and excavation depth can swing egress installation costs by $1,500 or more, with poured concrete and deep basements costing the most.
Egress Window Installation Built for Your Basement’s Depth
Turning a basement bedroom into a legal living space starts with one requirement: a code-compliant egress window. Our window installation team builds every well to the depth and drainage standard your foundation demands, matching material to soil conditions and budget. Ready to see what your basement actually needs? Request a free on-site assessment today.
Egress window pricing gets complicated fast once depth and well material enter the picture, and the way a contractor handles those two variables says a lot about how the rest of the job will go. Here’s what actually sets our process apart, not as a slogan but as a set of operational choices that affect your final bill.
Excavation Crews We Employ Directly
Many window-installation companies subcontract the digging to a third-party excavation outfit, which adds a markup layer and creates scheduling gaps whenever a well needs to go deeper than originally planned. We run our own mini-excavator crews, so when a site survey turns up bedrock, a high water table, or a foundation deeper than the standard 8 feet, we adjust the dig plan the same day instead of sending you back through a re-quote cycle two weeks later. That matters because depth, not the window unit itself, is usually the single biggest driver of cost overruns on these projects. The difference between a walkout-style basement and a deep poured foundation can shift total cost substantially, a pattern we’ve documented in detail in our breakdown of what drives egress costs across home types.
Four Well Materials, Stocked and Ready
We don’t push every customer toward a single preferred vendor’s product. We stock corrugated steel, galvanized steel, polyethylene, and precast concrete block wells, and we pour custom concrete wells on-site when a deep or high-pressure installation calls for it. That range means your quote reflects what your soil and depth actually require, not what happens to be sitting in our warehouse.
Itemized Quotes That Show Every Line
Every estimate we write separates excavation, well material, window unit, interior trim, and permit fees into distinct line items. If a competitor’s quote shows one lump number, ask them to break it down the way ours already does. An itemized quote is the only way to actually see where material choice and depth are adding cost, rather than taking a contractor’s word for it.
Drainage Designed In From the Start
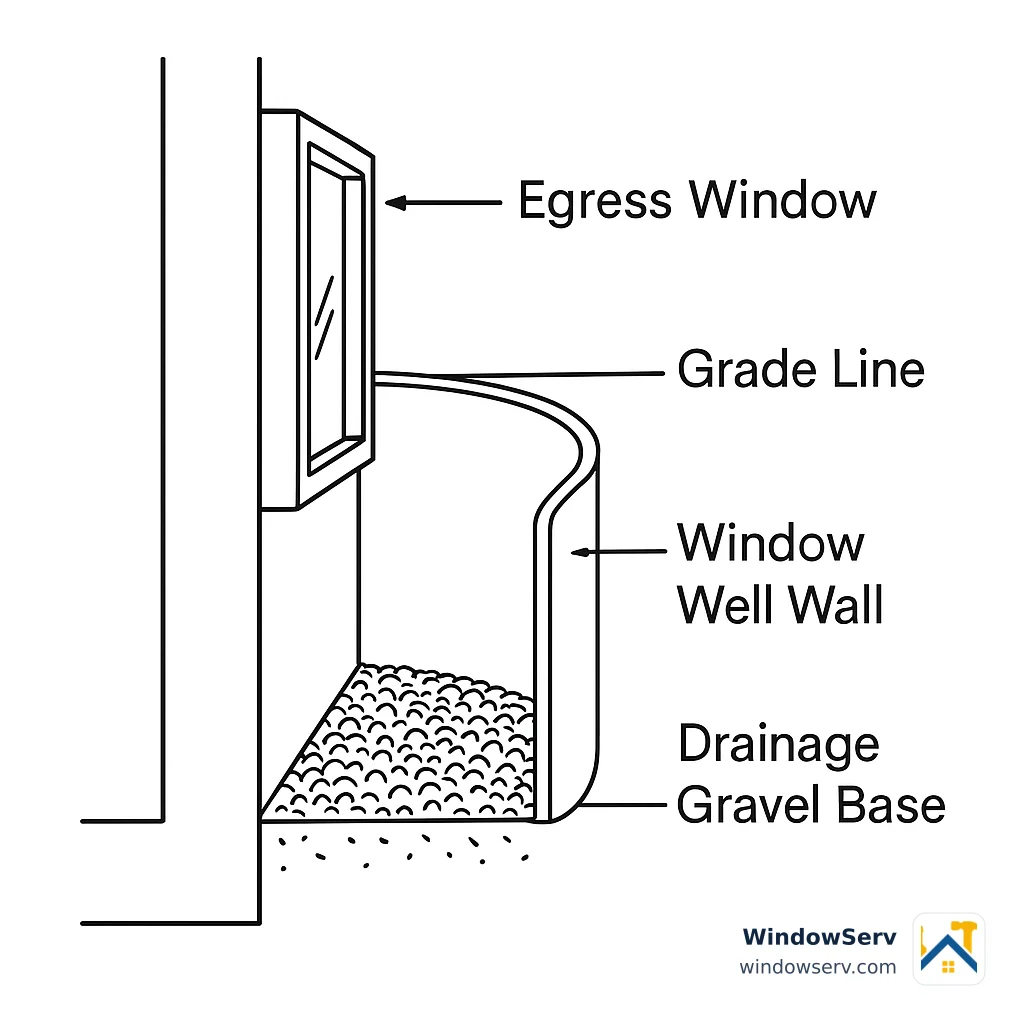
A window well that isn’t properly drained will eventually become a flooding problem, regardless of how well the window itself was installed. We grade the base of every well with a gravel drainage layer and tie it into existing exterior drainage or a dedicated dry well, following the same principles we’ve laid out for homeowners dealing with standing water in our guide to fixing egress well drainage after installation. Getting this right at install time costs far less than retrofitting drainage after a wet basement forces the issue.
Code Compliance and Permits Handled
Egress requirements aren’t uniform from one jurisdiction to the next, and the opening size, well dimensions, and ladder or step requirements for deeper wells all have to pass a local inspector before the job is considered done. We pull the permit, schedule the inspection, and build to the specific code cycle your municipality enforces, so you’re not left guessing whether your new window will actually satisfy the fire marshal.
Warranty Coverage That Matches the Investment
Given how much structural work goes into a deep excavation and well installation, we back the well structure and foundation seal with a 10-year warranty against settling or water intrusion, separate from the manufacturer’s warranty on the window unit itself. If a well wall shifts or a seal fails within that window, we come back and fix it at no charge, which is a meaningfully longer guarantee than the one-year labor warranties common in this trade.
Taken together, these are the practical reasons a quote from our team tends to differ from a quick estimate pulled off a phone call: we’re accounting for the full scope of excavation, materials, drainage, and code compliance before a number ever reaches you.
Short answer
material choice and excavation depth are the two biggest swing factors in egress window pricing, often adding more to the total bill than the window unit itself.
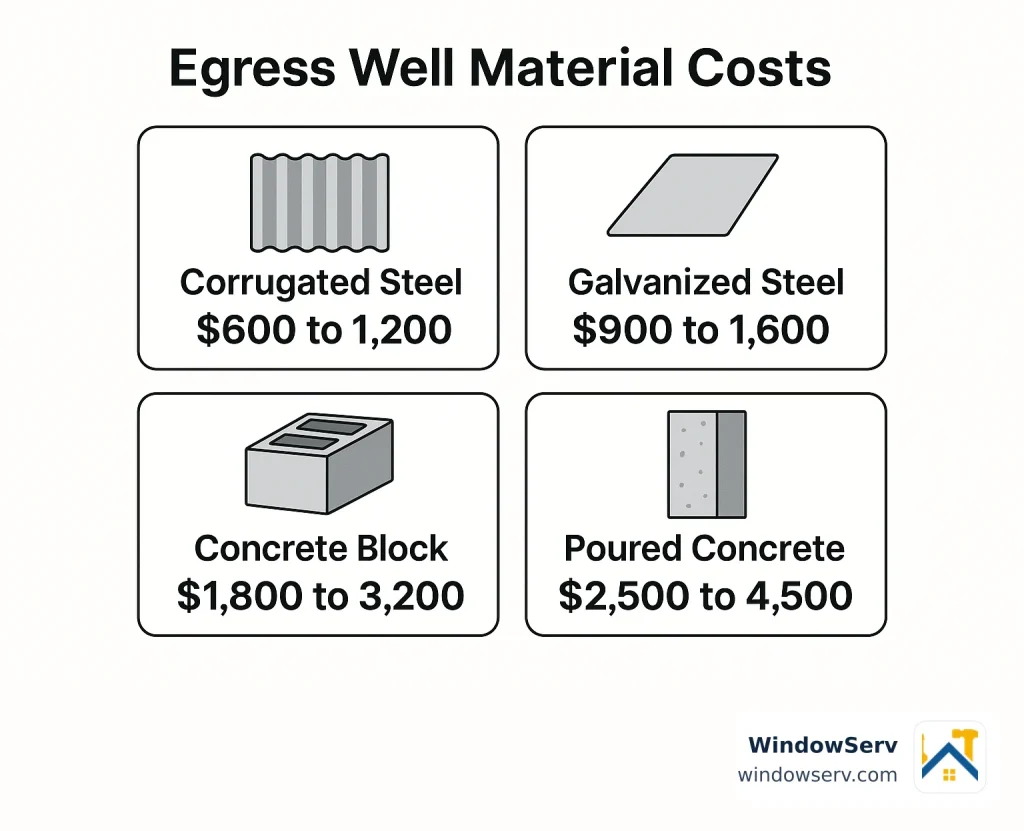
- Corrugated steel wells: $600 to 1,200 installed at standard depth, the most affordable option
- Polyethylene wells: $700 to 1,300, lightweight and rust-resistant
- Galvanized steel wells: $900 to 1,600, better corrosion resistance for wet sites
- Concrete block wells: $1,800 to 3,200, built for durability and deeper digs
- Poured concrete wells: $2,500 to 4,500, the strongest option past 8 feet deep
- Each foot of extra depth beyond standard grade typically adds $300 to 600 in excavation and shoring costs
This article was written by Daniel Reyes, Lead Project Estimator at WindowServ, who has spent over 14 years pricing and overseeing basement waterproofing and egress window installations throughout the region. Daniel has personally scoped more than 600 egress projects, from shallow walkout basements to deep poured foundations requiring custom concrete wells, and regularly works with local building departments to keep installations current with evolving egress code requirements. He trains our estimating team on how to translate soil reports and foundation depth into accurate, itemized quotes rather than flat guesses, and reviews every well-depth adjustment before it reaches a customer’s final price.
The window unit itself is usually the easiest part of this project to price, since most manufacturers publish fairly consistent costs for standard egress-compliant sizes. What actually makes one installation cost twice as much as another is almost always the well material and how far down the crew has to dig to reach it. Here’s how the five common well construction options stack up.
| Well Material | Price Range (Standard Depth, up to 8 ft) | Added Cost per Extra Foot | Typical Lifespan | Best Suited For |
|---|---|---|---|---|
| Corrugated steel | $600 to 1,200 | $150 to 250 | 15 to 20 years | Budget installs, well-draining soil |
| Polyethylene | $700 to 1,300 | $150 to 250 | 20 to 25 years | Sites with rust or corrosion concerns |
| Galvanized steel | $900 to 1,600 | $200 to 300 | 20 to 30 years | High water table, moderate depth |
| Concrete block | $1,800 to 3,200 | $300 to 450 | 40+ years | Deep wells, clay or unstable soil |
| Poured concrete | $2,500 to 4,500 | $400 to 600 | 50+ years | Deep foundations, maximum durability |
Corrugated steel and polyethylene sit at the lower end because they ship as pre-formed panels that bolt or clip together on-site, requiring minimal curing time and less specialized labor. The tradeoff is that steel panels can eventually rust through in consistently wet soil, and polyethylene, while rot-proof, isn’t rated for the same depths as masonry options. Galvanized steel splits the difference, holding up better against moisture than bare corrugated steel while still installing almost as quickly.
Concrete block and poured concrete cost more because they’re built, not assembled. Block wells require a mason to lay and mortar each course, and poured concrete needs forms set, concrete placed, and a curing period before backfilling can even begin. That additional labor and schedule time is reflected directly in the price, but so is the payoff: a properly poured concrete well can outlast the house’s original foundation work and handle lateral soil pressure at depths where steel panels would start to flex or buckle.
Depth is the second multiplier, and it compounds whichever material you choose. Here’s roughly how added excavation scope breaks down by depth range.
| Depth Range | Excavation Scope | Typical Added Cost |
|---|---|---|
| Up to 8 ft (standard) | Baseline dig, no shoring required | Included in base price |
| 8 to 10 ft | Wider trench, light shoring | $300 to 600 |
| 10 to 12 ft | Shoring required, more spoil removal | $700 to 1,200 |
| 12 ft or deeper | Engineering review often required | $1,500 to 3,000+ |
Past roughly 10 feet, excavation stops being a simple backhoe job and starts requiring temporary shoring to keep the trench walls from collapsing during work, which adds both labor hours and equipment rental to the bill. Homes with deep poured foundations, common in newer construction with full basements built for finished living space, are the ones most likely to land in that 10-to-12-foot or deeper range, which is part of why two houses on the same street can get very different egress quotes for what looks like an identical window. Drainage planning also becomes more critical at these depths, since a deep well collects more runoff and needs a properly sized gravel base and overflow route, exactly the kind of detail covered in our drainage fix guide for problem egress wells.
The practical takeaway is that material and depth should be priced together, not separately. A galvanized steel well at 7 feet might cost less than a corrugated steel well that has to go to 11 feet, even though steel is steel in both cases. Any quote that only lists “well installation” as a single line without specifying both the material and the expected depth is one worth asking more questions about.
Egress window installation sits near the top of the list of basement projects where DIY ambition runs into real structural and legal limits fast. It’s worth being honest about where a motivated homeowner can realistically contribute and where that ambition turns into a liability.
Where a Homeowner Can Reasonably Get Involved
Researching well material options, comparing manufacturer window specs, and handling interior cosmetic work like drywall patching or trim finishing after the structural work is done are all reasonable DIY contributions. Some homeowners also handle landscaping around the finished well, such as adding a decorative cover or grading soil away from the opening, once the core installation has passed inspection.
Why Most Homeowners Still Hire Out the Core Work
Cutting an egress-sized opening into a foundation wall involves removing load-bearing material below grade, and getting that wrong risks structural cracking or water intrusion that’s far more expensive to fix than the original project. Excavating below 6 or 7 feet without proper shoring is also a genuine safety hazard, not just a code technicality, since unsupported trench walls can collapse. Add in that most jurisdictions require a permitted inspection of the finished opening and well before it counts as a legal egress point, and the DIY path narrows considerably once you move past material research into actual construction.
| Task | DIY Feasible | Why |
|---|---|---|
| Choosing well material | Yes | Research and comparison only, no structural risk |
| Cutting the foundation opening | No | Risk of structural damage, requires specialized tools |
| Excavating below 6 to 7 feet | No | Trench collapse risk without proper shoring |
| Assembling a shallow steel or poly well | Sometimes | Possible for very shallow wells, still needs code approval |
| Pouring a concrete well | No | Requires forming, curing, and masonry experience |
| Drainage tie-in | No | Needs grading knowledge and often ties into existing systems |
| Permit application and inspection | No | Must meet exact local code specifications |
The Permit Problem
Even a homeowner capable of handling the physical labor still has to get the finished work approved by a local inspector, and failed inspections on egress projects are common when depth, opening size, or drainage don’t meet code on the first attempt. A failed inspection means redoing work that’s often already backfilled, which costs more in time and materials than hiring a licensed crew from the start would have.
What Hiring Out Actually Buys You
Beyond the labor itself, a professional crew brings a realistic sense of project timing that’s hard to replicate without having done it dozens of times. Deeper digs, shoring requirements, and concrete curing times all affect how long a job takes from permit to finished wall, a sequence we’ve mapped out in detail in our week-by-week breakdown of the egress installation timeline. A first-time DIY attempt at this kind of project rarely follows that schedule closely, and delays below grade tend to compound rather than resolve themselves.
The honest line to draw is this: if the project involves anything below the foundation wall surface, structural cutting, or a depth beyond a few feet, it belongs with a licensed contractor. Everything above that line, material selection, finishing, and ongoing maintenance, is fair game for a homeowner willing to put in the time.
If the decision guide above pointed you toward hiring out the job, which it will for most below-grade egress work, the contractor you choose matters almost as much as the material and depth decisions themselves. Here’s what’s worth checking before signing anything.
Confirm Licensing and Insurance First
Ask for the contractor’s state or local contracting license number and verify it directly through your state licensing board’s website rather than taking a business card’s word for it. Also ask for proof of general liability insurance and workers’ compensation coverage. Excavation work carries real injury risk, and if a worker is hurt on your property while uninsured, the liability can fall back on you as the homeowner.
Get at Least Three Written, Itemized Quotes
A verbal estimate or a one-line text message quote isn’t enough for a project with this many cost variables. Insist on a written quote that separates excavation, well material, window unit, drainage, permit fees, and interior finishing into distinct line items, the same way we structure ours. If one quote comes in dramatically lower than the others, ask specifically what well material and depth it assumes before assuming it’s simply the better deal. A lowball number often means a thinner well material, a shallower dig than your basement actually needs, or drainage work left out entirely.
Ask About Depth-Specific Experience
Not every window-installation company regularly handles deep foundations. Ask directly how many egress projects the contractor has completed at depths similar to yours, and ask to see photos or addresses of comparable completed jobs if possible. A crew that mostly installs shallow walkout-basement wells may underestimate the shoring and drainage needs of a 10-foot-deep installation.
Check References for Finished Inspections
A strong reference isn’t just a homeowner who liked the crew’s attitude, it’s one whose project actually passed its final code inspection on the first attempt. Ask references specifically whether the well passed inspection without rework, and whether the crew pulled the permit themselves or expected the homeowner to handle it.
Understand What the Warranty Actually Covers
Ask whether the warranty covers the well structure and waterproofing seal, the window unit, or both, and for how long. A one-year labor warranty is common but thin given how much can shift underground over a few seasons of freeze-thaw cycles. Get the warranty terms in writing as part of the contract, not just as a verbal assurance during the sales visit.
Clarify the Project Timeline Before Work Starts
Ask for a realistic start-to-finish timeline that accounts for permit approval, inspection scheduling, and any curing time if concrete is involved. Projects that involve a poured concrete well or a deep excavation with shoring naturally take longer than a shallow steel-well install, and a contractor who gives the same timeline regardless of your specific depth and material choice likely hasn’t thought through your site’s particulars.
Red Flags Worth Walking Away From
Be cautious of any contractor who wants a large upfront deposit before pulling permits, who can’t produce a license number on request, or who pressures you to skip the permit process entirely to save time or money. Skipping permits on egress work isn’t just a code violation, it can create real problems when you eventually sell the house and a buyer’s inspector flags an unpermitted below-grade opening.
Taking the time to vet a contractor against these points costs you an extra day or two of phone calls, but it’s considerably less painful than discovering mid-project that the well material installed isn’t rated for your soil conditions, or that the depth dug doesn’t match what code actually requires for your bedroom to count as legal living space.
Window well pricing varies more than most homeowners expect, and a generic online calculator can’t account for your foundation depth, soil type, or local inspector’s requirements. Before you budget off a number you found somewhere else, let us walk your basement in person. We’ll explain which well material actually fits your site, flag any depth-related cost drivers up front, and hand you a firm, itemized quote with no pressure to upsize materials you don’t need. Request your free quote and replace guesswork with real numbers.