
Your Old Wood Windows Are Worth Saving — Here’s Why Wood window restoration is the process of repairing, refinishing, and weatherproofing original wood window sashes and frames so they function
Your Old Wood Windows Are Worth Saving — Here’s Why
Wood window restoration is the process of repairing, refinishing, and weatherproofing original wood window sashes and frames so they function like new — without replacing them.
Quick answer: What does wood window restoration involve?
-
Assess the window condition (rot, paint failure, glazing cracks, stuck sashes)
-
Remove the sash safely from the frame
-
Deglaze by softening and removing old glazing putty
-
Strip old paint down to bare wood
-
Repair rotted or damaged wood with epoxy consolidants
-
Reglaze the glass with fresh linseed oil-based putty
-
Prime and paint with oil-based, breathable coatings
-
Weatherstrip for improved energy efficiency
-
Replace sash cords and restore hardware
-
Reinstall the sash and test for smooth operation
If your New Jersey home was built before the 1960s, there’s a good chance it still has its original wood windows. And if someone has told you they’re beyond saving, you may want to think twice.
Historic wood windows were built from old-growth timber — dense, resinous wood that simply isn’t available anymore. With proper care, these windows can last well over a century. In fact, restored historic windows paired with storm windows can actually meet or exceed modern energy code requirements — a fact that surprises most homeowners.
The frustration is real, though. Peeling paint, rattling sashes, drafts in winter, and swollen frames that won’t budge — these are everyday problems for older homes. But almost all of them are fixable, often for far less than the cost of replacement.
I’m Feiruz Gabibov, Chief Operating Officer of WindoServ, and through my work overseeing wood window restoration and repair services across New Jersey, I’ve seen how the right techniques can transform neglected historic windows into high-performing, beautiful features that add lasting value to a home. In this guide, I’ll walk you through everything you need to know — from tools and safety to step-by-step restoration and long-term maintenance.
Why Choose wood window restoration Over Replacement?
When a window salesman knocks on your door in Bergen or Essex County, they usually have one solution: rip it out and replace it. But for those of us living in historic New Jersey homes, replacement is often a step backward.
The primary reason to choose restoration is the material itself. Original windows (pre-1950s) were made from old-growth timber. This wood grew slowly in virgin forests, resulting in tight growth rings and high resin content. This makes it naturally resistant to rot and incredibly stable. Modern “replacement” windows are often made of vinyl or fast-growth pine that has a lifespan of only 15 to 20 years before the seals fail or the mechanisms break.
Restoring your windows also preserves the “eyes” of your home. Nothing ruins the curb appeal of a classic Summit or Montclair Victorian faster than flat, lifeless vinyl inserts.
Feature Restored Historic Wood Modern Vinyl Replacement Lifespan 100+ years (with maintenance) 15–20 years Material Irreplaceable old-growth wood Plastic or composite Repairability Fully repairable; parts can be remade Often non-repairable; must be replaced R-Value High (with storms/weatherstripping) Moderate to High Environmental Impact Low (reuses existing materials) High (landfill waste every 20 years)
Beyond aesthetics, there is the environmental factor. Every time a homeowner chooses window restoration, they keep high-quality materials out of New Jersey landfills. You aren’t just saving a window; you’re acting as a steward of architectural history.
Preparing for Success: Tools, Materials, and Safety
Before you dive into a wood window restoration project, you need the right kit. This isn’t a project for standard hardware store “quick fixes.” Using the wrong putty or paint can actually accelerate rot by trapping moisture against the wood.

At WindowServ, we recommend sourcing high-quality materials that professionals use. For example, the Window Preservation Alliance is a fantastic resource for finding specialized supplies and connecting with the broader preservation community.
Essential Materials for wood window restoration
If you’re tackling this yourself, your shopping list should include:
-
Two-part epoxy: We swear by Abatron LiquidWood (a consolidant) and WoodEpox (a filler). These bond to the wood fibers and can be sanded and painted just like real timber.
-
Glazing Putty: Look for Sarco Type M or dual-glaze putty. Avoid the cheap “quick-dry” stuff that becomes brittle and cracks in two years.
-
Sash Cord: Don’t use nylon; it stretches and degrades. Use a high-quality cotton cord like Samson Spot Cord.
-
Primers: Use a high-quality oil-based (alkyd) primer. It penetrates the wood better than water-based options.
-
Glass: If you have broken panes, try to source “wavy” or restoration glass to maintain that historic shimmer.
For more complex issues like broken frames, you might need professional window repair to ensure the structural integrity of the sash is maintained.
Safety Protocols for wood window restoration
Safety is the most important part of the preparation phase. If your home was built before 1978, you almost certainly have lead paint on your windows.
Lead Safety Checklist:
-
Containment: Lay down 6-mil plastic sheeting inside and outside the work area.
-
PPE: Wear a P100 respirator and disposable coveralls.
-
Dust Control: Never dry-sand lead paint. Use wet-scraping techniques or a HEPA-shielded vacuum.
-
Heat Safety: If using heat to strip paint, use a low-heat infrared tool (like a Speedheater) rather than a high-heat gun. High heat can vaporize lead and create a fire hazard in old wall cavities.
Following EPA RRP (Renovation, Repair, and Painting) guidelines isn’t just for pros—it’s essential for keeping your family safe from lead dust.
The Step-by-Step Wood Window Restoration Process
Restoring a window is a labor of love that requires patience. Here is how we approach a standard double-hung window in a Jersey City or Ridgewood home.
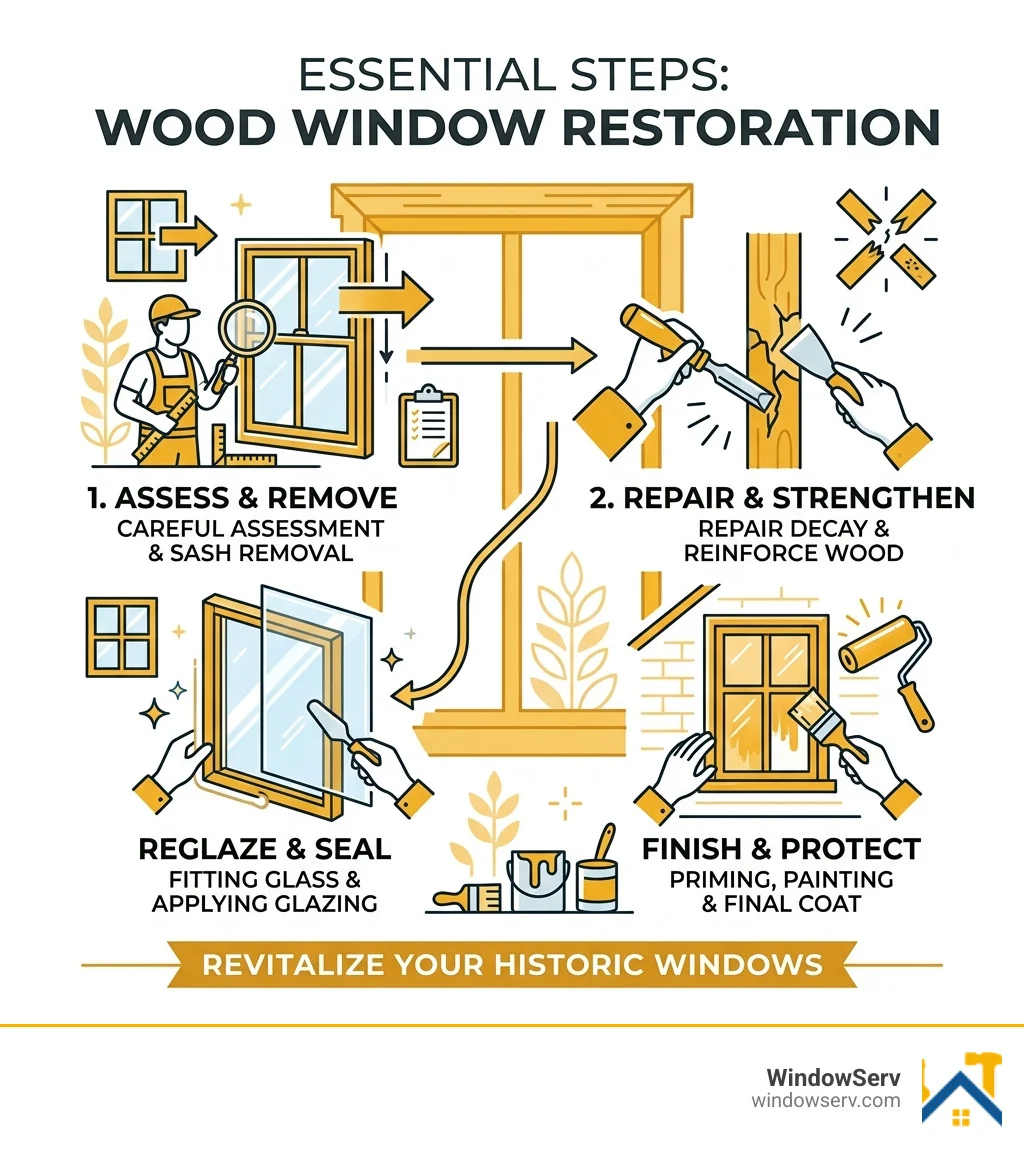
Step 1: Sash Removal Start by scoring the paint along the interior stops with a razor knife. Carefully pry the stops away. Once the bottom sash is free, you can access the parting beads (the thin strips of wood holding the top sash in place). Remove the sash cords from the weights—don’t let the weights drop into the wall!
Step 2: Deglazing and Paint Stripping This is where a steam box or infrared heater comes in handy. Soften the old, rock-hard glazing putty and carefully lift out the glass. Label every pane of glass so it goes back into the same opening! Once the glass is out, strip the paint down to the bare wood.
Step 3: Sanding Sand the wood progressively, starting with 40 or 60 grit and moving up to 120. Be careful not to round off the sharp profiles of the muntins (the small wooden bars between panes). If you find soft, punky wood, it’s time for window wood rot repair.
Repairing Damaged Sashes and Frames
Often, the bottom rail of the sash or the window sill is rotted because water sat there for decades.
-
Epoxy Repairs: For small areas of rot, use LiquidWood to harden the fibers, then fill with WoodEpox.
-
Dutchman Patches: For severe rot, we cut out the bad section and glue in a new piece of matching wood (a “Dutchman”). This is a superior method for rotten window frame repair because it maintains the strength of the original joinery.
Glazing and Finishing Techniques
Once the sash is repaired and primed, it’s time to put the glass back.
-
Bedding: Apply a thin bead of putty to the “rabbet” (the groove where the glass sits). This creates a watertight seal.
-
Points: Press the glass into the bedding and secure it with glazier’s points every 6 inches.
-
Tooling: Roll the putty into a rope, press it into the edge, and smooth it with a putty knife at a 45-degree angle.
-
Painting: Wait for the putty to skin over (usually a few days to two weeks depending on the product). When painting, overlap the paint onto the glass by about 1/16th of an inch. This “laps” the seal and prevents water from getting behind the putty.
Pro Tip: Never paint the sliding sides of your sashes. Leave them bare or apply a light coat of linseed oil or wax. Paint on these surfaces causes the windows to stick!
Enhancing Performance and Energy Efficiency
Many people believe old windows are “energy losers.” While a single pane of glass has poor R-value, most heat loss actually occurs through air infiltration (drafts), not the glass itself.
To make your wood window restoration truly high-performance:
-
Weatherstripping: Install “spring bronze” or silicone bulb seals. This creates a tight seal at the meeting rails and sills where most drafts occur.
-
Storm Windows: Adding a high-quality exterior storm window effectively creates a double-pane system. This can improve the thermal performance to a level that rivals expensive modern replacements.
-
SLIPs: Some homeowners opt for Slim Line Insulating Panels, which are interior-mounted glass panels that provide extra insulation without changing the exterior look.
If your windows are so drafty that restoration feels insufficient, you might consider window replacement alternatives like custom-built wood sashes that fit your original frames.
Long-Term Maintenance for Restored Windows
Once restored, your windows shouldn’t need a major overhaul for another 50 years. However, a little annual “TLC” goes a long way:
-
Inspect the Putty: Look for cracks once a year and touch up as needed.
-
Lubricate: Use a bit of beeswax or paraffin wax on the tracks to keep things sliding smoothly.
-
Clean the Pulleys: Ensure the pulleys aren’t gunked up with old paint.
-
Re-coat: Depending on your New Jersey weather exposure, the exterior paint may need a fresh topcoat every 5 to 8 years.
Frequently Asked Questions about Wood Window Restoration
How much does it cost to restore wood windows DIY vs. professionally?
DIY restoration is incredibly cost-effective. You can often restore a single window for under $50 in materials (putty, sandpaper, paint). However, it is time-consuming—expect to spend 15 to 40 hours per window. Professionally, wood window restoration in the New Jersey area typically ranges from $1,000 to $2,000 per window, depending on the level of rot and whether the service includes full mechanical overhaul (cords and weights).
Can restored historic windows really be energy efficient?
Absolutely. Studies have shown that a restored wood window with a high-quality storm window can exceed the 2012 International Energy Conservation Code requirements. The key is stopping the air leaks. By using weatherstripping and ensuring the meeting rails lock tightly, you eliminate the drafts that make a room feel cold.
What are the most common mistakes to avoid during restoration?
-
Painting the window shut: This is the #1 mistake. Always ensure the sashes are free before the paint fully cures.
-
Using the wrong putty: Avoid latex-based caulk for glazing; it won’t last and is nearly impossible to remove later.
-
Skipping the primer: Bare wood will suck the oils out of your putty, causing it to fail prematurely. Always prime the wood “rabbet” before glazing.
-
Breaking the glass: Expect to break about 20% of the glass on your first few windows. It happens to everyone! Have a local glass shop on speed dial.
Conclusion
At WindowServ, we believe that the craftsmanship of the past is worth protecting. Whether you live in a historic brownstone in Hoboken or a colonial home in Westfield, your wood windows are a vital part of your home’s identity and value.
Restoration isn’t just a repair; it’s an investment in sustainability and quality. By choosing to restore rather than replace, you’re ensuring that your home remains beautiful and energy-efficient for the next 100 years. Our local New Jersey experts are here to help, providing comprehensive solutions that save your original frames and provide up to 30% energy savings.
Ready to bring your historic windows back to life? Start your wood window restoration project today and see the difference that expert care can make.